Wednesday , 24 April 2024

HPI Savage XS SS Build – Part 11 – Wheels, Tires and Body

HPI Savage XS SS Build

The Build – Part 11
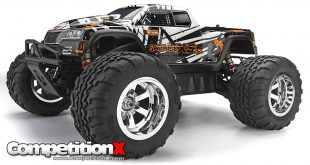
The final step in the HPI Savage XS SS build is the body, wheels and tires. HPI includes all three but you’ll need to glue the tires to the wheels and paint and mount the body.

Build Notes:
Gluing up the tires is a simple but sometimes messy step. I always recommend people picking up a set of the CompetitionX Gloo Toobs. These little glue tips allow you to precisely apply glue where you want it as well as actually SAVING the amount of glue you use.

If you’re a hero painter like me (NOT!), you can probably whip up something cool on the clear XS body. If not, there are plenty of painters on the web that can do a killer job for you.

You may notice that the end of this build there is nothing showing me mount the body on the truck. Well, that’s because the original XS body seems to have gone missing in the mail and a spare is on it’s way. To complete this build, I just left it out. Check out the review of HPI’s Savage XS SS for the paint that made the final cut.

HPI Savage XS SS Build - Step 156
HPI Savage XS SS Build – Step 156
The first step in the final step is to assemble and glue up the XS tires. Stuff the insert into the tire followed by the wheel. Make sure the bead of the tires is seated correctly in the wheel groove before gluing. Let each side dry for about 20 minutes before flipping over and gluing the opposite side.

HPI Savage XS SS Build - Step 157
HPI Savage XS SS Build – Step 157
Feed the body mounts into the top of the shock towers and lock in place with the body clips. The body height is adjustable but I installed them according to the instructions (2nd hole from the top).

HPI Savage XS SS Build - Step 158
HPI Savage XS SS Build – Step 158
Slide the wheel pin through the hole in the axle and capture it with the wheel hex adapter. Do this on all four corners of the XS.

HPI Savage XS SS Build - Step 159
HPI Savage XS SS Build – Step 159
Slide the freshly glued wheel and tire combo into place and secure with the locknut. Don’t forget to install the washer BEFORE the locknut. This washer helps distribute the pressure evenly so it won’t fatigue the center of the wheel.

HPI Savage XS SS Build - Step 160
HPI Savage XS SS Build – Step 160
Take your 2S (or 3S) battery and slide it into the battery compartment.Make sure the battery leads are towards the front.

HPI Savage XS SS Build - Step 161
HPI Savage XS SS Build – Step 161
The final step is to close the door to the battery compartment and lock it in place with the ‘flip’ locks. Make sure the battery leads feed out through the openings in the battery door.

And that’s it! You should know have a fully functional, rip-roaring HPI Savage XS SS! Word of caution: this truck is addicting! It is SO fast with a 3S that you may never want to lift!

I hope this build has helped you build yours. Don’t hesitate to ask any questions if you have them! Good luck.

Back to the HPI Savage XS SS Build List

About Tony Phalen

Tony Phalen - As an avid RC enthusiast, Tony has been building, bashing and racing RC Cars for over 30 years. He has participated in every kind of surface racing events - 1/18 scale trucks, 1/10 scale TC, Rock Racers, Rally - if it had wheels, he's raced it! He's also worked on both sides of the industry fence; collaborating with many major manufacturers (as well as being a sponsored driver) to working for a high-profile industry magazine. During this time he has learned many tricks, tips and techniques and is sharing that knowledge on CompetitionX - the most informative RC website on the internet!

Check Also

Injora Mud Paw 1.0 M/T Tires | CompetitionX

Injora Mud Paw 1.0″ M/T Tires | CompetitionX

Injora has announced a new set of 1.0″ M/T Tires for your tiny trucks – …