Team Associated Factory Team T4.2 Stadium Truck Build
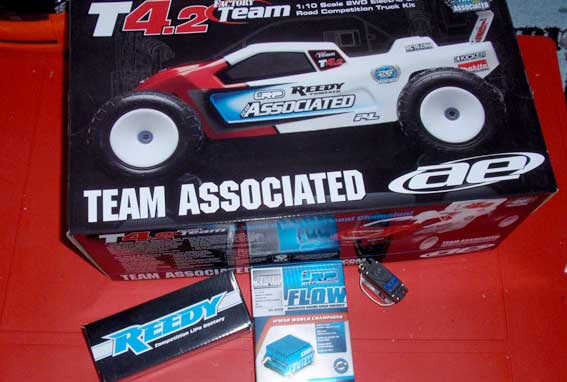
The Build – Part 6 The next step involves installing the electronic gear. As mentioned before in the build Table of Contents, we’ll be using a Team Associated XP DS131 steering servo, LRP Flow brushless ESC, Reedy Sonic 17.5 brushless motor and a Reedy WolfPack LiPo battery. Vintage car with current technology…a winning combo!
Build Notes: No real tricks involved with this step other than making sure you solder the wires onto the motor in the correct sequence; A wire to A tab on the motor, B wire to B tab, etc.
Team Associated Factory Team T4.2 Build – Step 102 First we’ll install the XP DS1313 servo. AE has included different servo horns for a variety of servos, so make sure you choose the one that is designed for your servo. Fit the ballend to the servo horn as shown, then install the blue expansion ring. Finally, attach the servo horn assembly to your servo, making sure the servo horn is just slightly off 90 degrees (see manual). You’ll be using the screw that came with your servo to secure the horn.Team Associated Factory Team T4.2 Build – Step 103 Attach the servo mounts to the servo as shown, but do not tighten the screws yet. You can use the Servo Chart on page 17 of the manual to figure out which spacers to use.Team Associated Factory Team T4.2 Build – Step 104 If you tightened down the servo mounts in step 103, the holes for mounting to the chassis may not line up when you install the servo assembly into the chassis. If you loosen them up and re-install, you’ll see that you won’t be able to tighten them once it’s in the chassis. The fix? Simply mount the servo to the BOTTOM of the chassis first! Line up the holes in the chassis, insert the 4-40×3/8 screws from the other side and snug down. Now tighten the servo mount screws. Remove the 2 screws attaching the assembly to the chassis, flip the servo to the inside of the chassis and secure with the 2 4-40 screws again. The holes will line up perfectly!Team Associated Factory Team T4.2 Build – Step 105 See, a perfect fit without driving you crazy trying to tighten up the servo mount screws.Team Associated Factory Team T4.2 Build – Step 106 Build the servo link assembly per the instructions…Team Associated Factory Team T4.2 Build – Step 107 …and pop into place between the servo horn and the steering system.Team Associated Factory Team T4.2 Build – Step 108 Slide your motor into place at attach to the motor mount using the M3 screws. Don’t forget the washers. Do not tighten all the way down yet.Team Associated Factory Team T4.2 Build – Step 109 Slide your pinion on the motor shaft and align it with the spur gear. Make sure there is complete tooth contact, then tighten down the pinion’s setscrew to secure. You’ll also want to set the gear mesh at this point. Page 18 in the manual has good instructions on how to do this.Team Associated Factory Team T4.2 Build – Step 110 Attach the gear cover to the motor mount as shown and pop the dust cover button into place. I lost the 2 4-40 screws used in this step but thankfully have some blue, Factory Team ones to replace them.Team Associated Factory Team T4.2 Build – Step 111 Tape your receiver and ESC into place as shown, slightly behind the channel running across the middle of the chassis. Try and get them as close to the center as possible for better weight distribution. Feed the ESC power lead through the slits in the chassis, resting it in the channel. Plug it in to the receiver.Team Associated Factory Team T4.2 Build – Step 112 This ESC power lead will move around a bit, so I usually tape it into place to secure it. This is also a good time to plug the servo lead into the receiver and mount the ESC switch.Team Associated Factory Team T4.2 Build – Step 113 Run the receiver antenna down through the chassis and back up through the hole. Feed it into the antenna tube and press the antenna tube into the chassis. Secure with the 5-40 setscrew. I use a little tape to keep the receiver wire from flopping around as well. Just be sure not to crimp the wire.Team Associated Factory Team T4.2 Build – Step 114 Feed the motor wires to the motor (through the shock tower) and solder into place. Remember, A wire to the A tab, B wire to the B tab and C wire to the C tab. Feed the sensor wire through as well and press into the motor.Team Associated Factory Team T4.2 Build – Step 115 Screw the 4-40 setscrews into the battery mount holes as shown.Team Associated Factory Team T4.2 Build – Step 116 Place the battery into the truck. Team Associated has supplied 4 foam pads (2 thick, 2 thin) so you can space the battery forward or back for better weight distribution. Since I’m not 100% sure how I want them to be yet, I placed them per the manual; 1 thick/1 thin up front, 1 thick/1 thin in the rear.Team Associated Factory Team T4.2 Build – Step 117 Slide the rear of the carbon fiber battery strap underneath the rear tower and drop into place (the holes in the strap should fit over the 4-40 setscrews). Secure the strap with the 2 Factory Team blue thumbscrews.
Tony Phalen - As an avid RC enthusiast, Tony has been building, bashing and racing RC Cars for over 30 years. He has participated in every kind of surface racing events - 1/18 scale trucks, 1/10 scale TC, Rock Racers, Rally - if it had wheels, he's raced it! He's also worked on both sides of the industry fence; collaborating with many major manufacturers (as well as being a sponsored driver) to working for a high-profile industry magazine. During this time he has learned many tricks, tips and techniques and is sharing that knowledge on CompetitionX - the most informative RC website on the internet!