The Build – Part 12
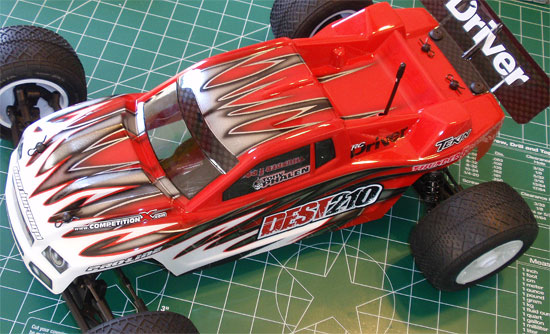
The final step with the Team Durango DEST201R is the body, wheels and tires. Since they are a good all-around tire at the track I plan to test at, I went with the Proline Suburbs. The body comes with the kit but I sent it out to JGO Paintz (located in Las Vegas) and the guy did it up! Way more bad-ass than I was expecting but certainly looks good in my red/white/black colors. I wish I could retain this guy to do ALL my race bodies like this!
Build Notes: You will be gluing the tires to the wheels so I suggest picking up some CompetitionX Gloo Toobs. These will really make your life much easier during the gluing process.
Tires are 80% of your vehicles setup. Check to see what tires work at your track before mounting anything up.
To help mount the tires to the wheels, we will be cutting the inside of the foam inserts. This is not really a step but more of a tip; if you choose to keep the inserts full move on to Step 120.
Team Durango DEST210R Build – Step 118
The first step for mounting the tires is to cut away part of the foam insert. Take your insert and turn it inside out.
Team Durango DEST210R Build – Step 119
With a pair of sharp scissors, but a little bit from the inside ‘corner’ as shown. You don’t need to take much off.
Team Durango DEST210R Build – Step 120
Flip your inserts back and stuff them into the tires as shown. Make sure they seat completely within the tire.
Team Durango DEST210R Build – Step 121
Push the wheel through and glue into place. Glue one side, let it dry and duplicate with the other side. Again, the CompetitionX Gloo Toobs are excellent at avoiding any kind of gluey mess.
Team Durango DEST210R Build – Step 122
Once the tires are completely dry, mount them up to the DEST210R. Make sure the axles-mounted hex is seated in the wheel hex before cranking down on the wheel nut.
Team Durango DEST210R Build – Step 123
Attach your front body mounts as shown. They are directional so make sure you have the splined side attaching to the splined mount. TIP: Don’t screw the screws in all the way yet. Press the mounts into place and test fit your body. If it doesn’t fit, you can adjust the mounts without having to take the screws out. Once you get the mounts where you want them, tighten the screws all the way down.
Team Durango DEST210R Build – Step 124
Place the body on and secure with the body clips. Looks sick, right? JGO is the man!
And you’re done! Thanks so much for following along with the step-by-step build of the Team Durango DEST210R. A full report of this truck will be in an upcoming issue of RC Driver Magazine. Don’t forget to check out some of our other builds on the RC Supports Page.
Tony Phalen -
As an avid RC enthusiast, Tony has been building, bashing and racing RC Cars for over 30 years. He has participated in every kind of surface racing events - 1/18 scale trucks, 1/10 scale TC, Rock Racers, Rally - if it had wheels, he's raced it! He's also worked on both sides of the industry fence; collaborating with many major manufacturers (as well as being a sponsored driver) to working for a high-profile industry magazine. During this time he has learned many tricks, tips and techniques and is sharing that knowledge on CompetitionX - the most informative RC website on the internet!

 Tires are 80% of your vehicles setup. Check to see what tires work at your track before mounting anything up.