
Beginner’s Guide to RC – How To Balance Your Offroad and Onroad Wheels
Many of you put in countless hours of preparation and maintenance in your offroad and onroad vehicles, but how many of you actually take the 5 minutes to balance your tires? Unbalanced tires can cause that corner to bounce off the surface, resulting in inconsistent handling and lots of vibration. Vibration, in turn, can lead to screws falling out, overworked shocks or even bent parts.
The process of balancing tires is a pretty simple one and only requires a few tools. For this exercise, we’ll be working with GridRC’s sweet new BalancePro V2 and BalancePro ZERO.
The BalancePro V2 is CNC-machined from aluminum for a precise construction and features a cool tri-foot design. Each foot has a screw running through it that allows you to adjust the balancer to achieve a perfectly flat surface. This is key and means you can be confident that the balancing process is a result of the tire and not an uneven surface. The V2 comes with three Delrin adapters; a 12mm, 14mm and 17mm hex. A precision ground, 4mm shaft rides on four micro bearings for ultimate precision. During this How To, it was extremely sensitive to the amount of lead tape I was putting on, but I actually found that to be a good thing; if it wasn’t sensitive, my work could be improperly balancing the tire and I’d still have issues.
Since touring cars roll at much higher speeds, I decided to go with the BalancePro ZERO. This unit uses a pair of parallel twin-blades that give a continuous, zero-friction contact area, something a bearing-supported system can’t offer. It is constructed from aluminum and also features the same tri-foot design. The balance rod is precision ground and has a Delrin adapter pressed on.
To achieve balance, I’m using some Dynamite Wheel Balancing Tape I found for about $6. This tape features a sticky backside that allows you to trim to size and stick anywhere on the wheel you need. You can also use something like AKA’s Wheel Balancing Clay, a good alternative that allows you to pinch off a piece and apply to the inside of the wheel.
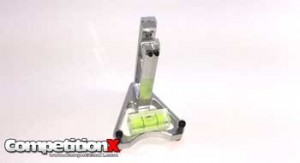
The first step, after acquiring the proper tools, is to make sure the location you are going to balance your tires on is completely flat. As I mentioned above, both balancers come with three adjustable feet to level things out. You will need to supply your own bubble level – I found these Racers Edge Miniature Bubble Level ones to do the trick. They’re tiny enough to work on both balancers and only cost a few dollars. So, adjust the feet to get everything level and let’s move on.

We’re going to be using a 1/8 scale wheel, so I’m grabbed the 17mm adapter. Install it onto the 4mm balancing shaft, then press one of the two remaining adapters onto the front of shaft, essentially ‘pinning’ the wheel into place. Now press the shaft through the wheel, leaving about 5-7mm sticking out (see the picture for reference). Slide the final adapter onto the backside of the wheel and press it up against the 17mm adapter. Place this assembly onto the BalancePro V2; make sure the shaft sticks all the way through both bearing sets and does not rub against the bearing screws. You may need to adjust the 4mm shaft to get the spacing right. It seems more complicated that it really is; you’ll see what I’m saying once you put it together.
Once you have the wheel on, give it a spin, letting it rock back and forth until it comes to a stop. Take note of this stopping point.

Install a little tab of the tape (or putty) to the high spot on the wheel. Usually this is done on the inside but I did it on the outside so you could see it. Give the tire another spin, watching to see if it rocks back and forth to a stop. The idea is that we want the tire to slow to a stop without rocking back and forth, preferably stopping at different points as well. Continue to apply tape (or putty) to the high spot until the tire slows to a stop without rocking back and forth. This may require a little or alot, it depends on how unbalanced your tires are.
Don’t be afraid to put larger chunks on, you can always remove some tape (or putty) if your balancing is getting out of hand.

I also balanced a 1/10 scale buggy tire using the same process. This took a little less tape since the tires weigh less and they weren’t all that unbalanced.

As I mentioned before, the BalancePro ZERO uses a little different method of balancing, however the overall process is the same. Once you’ve attached the wheel to the balancer, set it in the groove and give it a light touch. It should automatically start rocking back and forth, showing you just how unbalanced they were. This was a set of pre-mounts and I was amazed at how off they were. Apply tape (or putty) to the inside at the high spot to balance things out.
You’ll get very quick at doing this after the first few tires, but the rewards on the track will be well worth it. It’s also good to note that if you’re one of those that likes to trim your treads to meet the track conditions, you’ll probably want to balance your tires after you do this.
Good luck!


Hey this is a really cool post! My dad and I go visit a lot of places in southern California (mostly Death Valley) for a little Off-road fun. He’ll like this post and I’m sure he’ll also appreciate the tips on tire balancing for when we take the FJ40 out again. it’s been a while since we’ve gone so this will be a good read for us to get stoked again. Thanks for the good post!
Hi Cohen.
Alot of people don’t pay much attention to this, but it actually helps the performance out quite a bit. Give it a try and let me know what you think!
Tony
I didn’t realize that having your tires balanced could make such a difference. My brother is always working on his car trying to improve it’s performance. He will love hearing about how easy it is to balance your own tires!
It’s the small things that can make the biggest difference. This will work with all tires from 1:10 to 1:5 scale. Good luck!