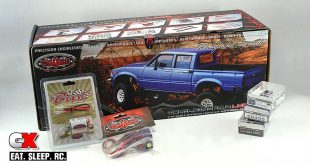
The Build – Part 6
In Part 6 of our RC4WD Trail Finder 2 LWB Trail Truck build, we’ll be installing the steering, steering servo, shifting linkage and shift servo. Much easier than it sounds.
 Before installing, it’s always best to hook up all the wiring and center the servos. This will ensure they are correct before attaching the linkage.
Have some blue threadlocker available and use a small dab on any screws that thread into aluminum parts.

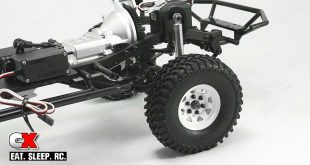
First, assemble the drag link and steering link. Note the orientation of the curved steering link rod ends.

Attach the drag link to the servo horn (horn not included with the TF2) using a 3x14mm screw. This is not noted, but this is the length I found to be the best fit. Attach the servo horn to your servo. For this build, I’m using a Futaba S3470SV Steering Servo; lots of torque to help guide my rig through the toughest terrain!

Install the servo into your TF2 with the servo output shaft towards the rear of the truck. Don’t worry about routing the servo wires yet; we’ll do that in a bit.
Connect the drag link and one end of the steering link to the left steering knuckle, then connect the other end of the steering link to the right steering knuckle.

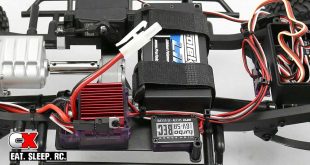
I changed the build up a bit here; it was easier for me to correctly install the drag link to the shift fork first. Start by building the shifting servo drag link. The suggested length of 35mm is spot on.

Attach the drag link to the shift fork lever.

Install the servo to the mounts with the 4 M3x10mm screws. Attach the servo horn (included with your servo) on your servo with a slight offset as shown, then attach the drag link to the servo horn.
Since this servo is only going to be used to shift gears, a super duper high-end unit is not required. I opted to use Futaba’s S9405 servo; it has great torque and speed; 100oz/in and .11 seconds respectively. I still think it might be a bit overkill for this purpose.
Nice job – servos installed! Time to move on to the bumpers, wheels and tires.
Trail Finder 2 LWB Trail Truck Build – Part 1 – Frame Rails
Trail Finder 2 LWB Trail Truck Build – Part 2 – Radio Pad, Body Mounts
Trail Finder 2 LWB Trail Truck Build – Part 3 – Gearbox
Trail Finder 2 LWB Trail Truck Build – Part 4 – Suspension
Trail Finder 2 LWB Trail Truck Build – Part 5 – Drivetrain
Trail Finder 2 LWB Trail Truck Build – Part 6 – Steering, Shifting
Trail Finder 2 LWB Trail Truck Build – Part 7 – Bumpers, Wheels and Tires
Trail Finder 2 LWB Trail Truck Build – Part 8 – Electronics