The Build – Part 7
The RC4WD Trail Finder 2 LWB Trail Truck uses plastic, tube bumpers front and rear. For rollers, stamped steelies are wrapped in a set of great-looking scale tires.
 The build process of the wheels is a bit challenging, but take your time and it’ll work. You really need to pinch them down to get them mounted; see Step 3 for an additional mounting notes.
Install the front bumper into the mounts. Reference both the instructions and picture to get an idea of which mounting holes you should be using.

Use the same procedure here as you did in Step 1. If you feel either of these need adjustment, you can do that when you install the body.

Ok, to install the stamped wheels, patience is definitely needed. The instructions state to use the longer M2x14mm screws to get the wheels initially pinched, then use the shorter screws in the remaining holes. This is key and, really, the only way you’re going to make this work.
Also, make sure you line up the see-through triangles in both the front and back parts of the wheel. If you don’t the wheels will have triangle ‘overlap’ and it will look funny. Test fit them and you’ll see what I’m talking about. Build all 4 wheel/tire assemblies.

Here’s what your completed wheels/tires should look like. If you’re like me, you’ll want to take a short break after dealing with this. It’s definitely a tricky process but the final result is pretty rad.
The cross pin, wheel hex and locknut were already attached to my axle, so all you’ll have to do here is remove the locknut, attach the wheel/tire combo and replace the locknut. Just make sure that the wheel pin doesn’t fall out during this procedure.
Woo hoo – look at that; we got ourselves a roller! Time to finalize this rig with some electronics and get it out in the dirt!
Trail Finder 2 LWB Trail Truck Build – Part 1 – Frame Rails
Trail Finder 2 LWB Trail Truck Build – Part 2 – Radio Pad, Body Mounts
Trail Finder 2 LWB Trail Truck Build – Part 3 – Gearbox
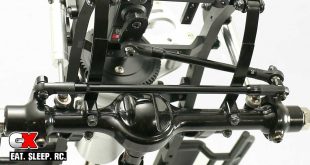
Trail Finder 2 LWB Trail Truck Build – Part 4 – Suspension
Trail Finder 2 LWB Trail Truck Build – Part 5 – Drivetrain
Trail Finder 2 LWB Trail Truck Build – Part 6 – Steering, Shifting
Trail Finder 2 LWB Trail Truck Build – Part 7 – Bumpers, Wheels and Tires
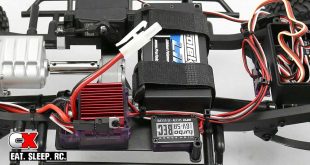
Trail Finder 2 LWB Trail Truck Build – Part 8 – Electronics