The Build – Part 10
The final step in the Tamiya TA07 Pro build are the tires, wheels, body mounts and final battery tray assembly. The battery tray will be the oddest to build as it has to conform to the strange upper deck, but the final result is extremely sturdy.
 There are multiple variables with this final step; wheel and tire combos, LiPo battery sizes and body styles that will require you to trim the foam bumper. Finish off the final steps carefully so your finished product will be complete and the way you want it.
Since I’ll be driving the TA07 Pro primarily at the Tamiya track, I opted to install a set of the B3 pre-mounted race tires. They work great at this track and, well, they’re pre-mounts so all I have to do is pull them from the package and slap them on the car. Done.

To install them, we need to first finish the axle assembly. Slip a plastic ‘crush tube’ on to the axle followed by a wheel bearing and cross pin. Slide the plastic wheel hex on to the axle and key it to the cross pin. Install the tire and secure it all down with the blue wheel nut. Repeat on all four corners.

Attach the rear body posts.

Attach the front body posts to the lower bumper, then attach that assembly to the car.

Slip the foam bumper into place and secure with the upper bumper plate. Some trimming of the foam bumper might be needed depending on the body you will be running.

Attach the battery stops to each end of the battery box. Here’s a close up of how much room is available between my particular battery and the stop; you can fill this space with the sticky-backed foam pad included with the kit.

Attach the battery holder. This holder comes with various spacers to properly fit it to the LiPo battery you will be using. Build it per the manual, then test fit your battery. You can add or remove the shims based on this fitment.

Assemble the battery door. Use some of the sticky-backed foam to help keep the battery firmly in place when the door is attached.

Slip the battery in followed by the battery door. Secure the door with a body clip.

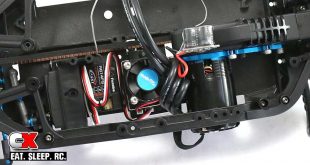
There’s a problem with this chassis setup when using batteries with bullet plugs. As you can see, the outside connector hole resides under the upper chassis rail, making it impossible to insert the plug with the battery installed. Here’s a quick tip; partially insert the battery, then connect the furthest lead as shown (in my case, the furthest lead was the positive one). Now slide the battery all the way in and lock it in place with the battery door. You’ll need to do this step in reverse to remove the battery.
And just like that, you’ve got a completed Tamiya TA07 Pro Touring Car. The final steps will be to paint and mount a body – you’ll also need to attach the body mount pins however their location will be dependent on which body you run.
Now charge that pack and let’s go drive! Good luck.
Tamiya TA07 Pro Build – Part 1 – Rear Suspension
Tamiya TA07 Pro Build – Part 2 – Front Suspension
Tamiya TA07 Pro Build – Part 3 – Motor Mount
Tamiya TA07 Pro Build – Part 4 – Differentials
Tamiya TA07 Pro Build – Part 5 – Motor Mount / Drive Belt
Tamiya TA07 Pro Build – Part 6 – Steering
Tamiya TA07 Pro Build – Part 7 – Knuckles / Rear Hubs
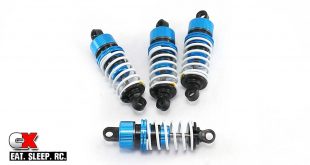
Tamiya TA07 Pro Build – Part 8 – Shocks
Tamiya TA07 Pro Build – Part 9 – Electronics
Tamiya TA07 Pro Build – Part 10 – Wheels / Body Mounts / Battery Tray