The Build – Part 5
Team Associated has a strong past when it comes to pan cars, and it shows with all the refinements at the back of the F6. Love the lightened rear hub, super-smooth diff and well-designed motor mount!
 The differential is the heart of any pan car! Take your time to build it and always make sure it’s maintained to perfection.
The F6 comes with multiple rear pod inserts to change the ride height and wheelbase of the car. The kit setup states to use the 0-block, so pull 2 of these out and press the flanged bearing into each. Press one assembly into the left bulkhead…

…and the other into the right. Notice the 0 on each; the left one is at the bottom, the right is at the top. You’ll want to match the ride height adjusters like this if you change to a different set later on.

Slide the carbon rear axle through the bearings and secure with the left wheel hub. You’ll want to leave a teeny tiny gap (literally teeny tiny) between the left hub and the bearing; as small a gap as possible before cinching up the hub with the 2.5x12mm screws.

Time for the differential. I’ve laid all the parts out so you can see how they go together. We’ll put them together slowly in the next couple of steps.

The bearings supplied by AE have a blue shield on one side.
Slide one of the 1/4×1/8″ bearings onto the axle, blue shield facing the car. Apply a small drop of the silicone grease to the hub and set one of the D-Drive rings into place. The grease will help keep the D-Drive ring from moving during assembly.
Press the 12 carbide diff balls into the outer holes of the spur gear.

Apply a small amount of silicone grease to the balls on both sides of the spur gear. Slide the spur gear over the bearing.
Press another 1/4×1/8″ bearing into the rear hub, blue shield facing out. Add a small drop of grease to the hub and set the other D-Driver ring into place.

Place the assembled hub onto the axle.
Build the thrust washer setup; thrust washer (with 4.15mm ID hole), bearing and second thrust washer (with 4mm ID hole). Make sure the grooves on both thrust washers are facing the bearing. Add a liberal amount of black grease in-between all the parts. Drop this down into the blue thrust cone.
Add the Bellville washers, making sure the are facing each other (see manual). Carefully slip the final assembly onto the rear axle and secure it all with the M4 locknut.
To set the diff, tighten the M4 locknut down and, while holding both rear hubs, spin the spur gear with your thumb. It you can spin it, tighten the nut down 1/4 turn and try again. Once you get to the point where you can’t spin the spur gear, you should be at a good starting point. You may need to fine tune it slightly during the first run. It’s easier to hold the hubs if you slide the rear tires onto them first.

Attach the wheel cap, slide the wheel hub pin through the holes and secure with the setscrew.

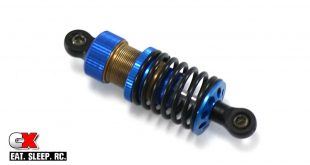
Attach the center shock. The top of the Factory Team pivot balls accepts a 3.0mm driver, making it easy to attach to the shock. This also makes it very easy to disassemble for maintenance as well.
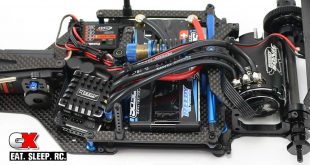
Insert your motor into the chassis and secure with the pair of 3x10mm screws. Don’t forget to add the blue aluminum washers as well.
There you have it; a built and ready-to-rock rear axle! We didn’t include a pinion gear yet as I’m not 100% sure what my gearing is going to be, so I’ll be adding that later.
Next up – adding the front and rear wings!
Team Associated Factory Team F6 Build – Opening Page
Team Associated Factory Team F6 Build – Part 1 – Shock, Damper Tubes & Turnbuckles
Team Associated Factory Team F6 Build – Part 2 – Front Suspension & Servo
Team Associated Factory Team F6 Build – Part 3 – Steering
Team Associated Factory Team F6 Build – Part 4 – Rear Suspension
Team Associated Factory Team F6 Build – Part 5 – Rear Axle
Team Associated Factory Team F6 Build – Part 6 – Wings
Team Associated Factory Team F6 Build – Part 7 – Electronics