The Build – Part 9
The Team C TM4 comes with a great set of threaded aluminum shocks. They feature a bottom load cartridge, multiple pistons and bleeder caps for easy building.
Build Notes: We’ll be using shock fluid in this step so it’s a good idea to have some paper towels or rags handy. Also, you might want to put something down on your workspace before building. You don’t want your mom/girlfriend/wife pissed when you get shock fluid all over her nice table.
Team C TM4 Buggy Build Step 94
Let’s first identify all the parts we’ll be using. On the left are shorter shock bodies, used for the front. The longer shocks bodies on the right are for the rear. The cartridges and spring adjusters are the same for both.
Team C TM4 Buggy Build Step 95
Like the shock bodies, the two shorter shock shafts are for the front, the longer ones for the rear.
Team C TM4 Buggy Build Step 96
There are also a bunch of o-rings included. From the bottom left (and rotating clockwise), the red o-rings go inside the shock cartridge, the thin larger o-rings go on the outside of the top of the shock bodies (cap side), the smaller o-rings go on the outside of the lower cartridge and the thick, larger o-rings go inside the spring adjusters. Separating them will make it easier when the steps call for them.
Team C TM4 Buggy Build Step 97
Grab the 4 thick, large o-rings and carefully insert them into the groove in the spring adjuster. We want to do this step up front; if you get oil on your fingers (and then on the o-rings) they become a major pain to install.
Team C TM4 Buggy Build Step 98
Take the 8 smaller o-rings and loop them over the cartridges. 2 will go on each cartridge.
Team C TM4 Buggy Build Step 99
Finally, take the thin, larger o-rings and loop them over the cap-side of the shock bodies.
Team C TM4 Buggy Build Step 100
Next is the shock cartridge. I’ve laid out the parts in the order they will be installed. Everything goes together easily, however the snap ring might cause you a little grief. There really is no ‘best’ way to do it; just slide an end in and carefully force the other side in. Just make sure it snaps completely into the grooves in the cartridge.
Team C TM4 Buggy Build Step 101
Screw the cartridges on the shocks. Be careful not to ‘pinch’ the o-ring outside the shock body. If you apply a small amount of oil to the outer o-ring, it will help it seat better.
Team C TM4 Buggy Build Step 102
Assemble the 4 shock shafts. The front shafts get the black pistons, the rears get the white.
Team C TM4 Buggy Build Step 103
Put a light drop of oil onto the threads of the shaft and slide it into the shock body assembly. Press SLOWLY through the cartridge so you don’t tear the internal o-rings. Once through, screw the shock eyelet onto each shaft.
Team C TM4 Buggy Build Step 104
Slide the shaft up and down a few times to coat it with oil. Pop a bushing into each shock eyelet.
Team C TM4 Buggy Build Step 105
Fill your shocks to the top with oil. Plunge the shaft a few times, slowly, until all the bubbles rise to the top (the oil level will probably go down a bit as well). Place the shocks in a shock stand (I’ve listed a few at the bottom of this page) and fill them back up with fluid. Let them site for a few minutes while the oil rise.
Team C TM4 Buggy Build Step 106
Screw the top onto the shock. Slowly compress the shock; you should see some oil come out of the bleeder hole in the cap. Once compressed, screw the bleeder screw into the cap. Clean up any excess oil that has leaked out.
Team C TM4 Buggy Build Step 107
Thread the spring adjusters onto the shocks followed by the springs (shorter ones up front, longer in the rear) and lower spring retainers (key the opening in the retainer to the nub on the eyelet). Make sure the front spring adjusters are set equal, then set the rear spring adjusters equal. You can fine tune these when you set the ride height at the end of the build.
Team C TM4 Buggy Build Step 108
Attach the upper shock mount to the middle hole in the front tower.
Team C TM4 Buggy Build Step 109
Bolt up your front shocks. Use the inside hole in the suspension arm.
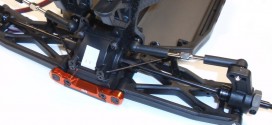
Team C TM4 Buggy Build Step 110
Attach the upper shock mount to the middle hole in the rear tower.
Team C TM4 Buggy Build Step 111
Bolt up your rear shocks. Use the inside hole in the suspension arm.
Awesome job! Compress each corner a few times to make sure everything feels silky smooth!
Tony Phalen -
As an avid RC enthusiast, Tony has been building, bashing and racing RC Cars for over 30 years. He has participated in every kind of surface racing events - 1/18 scale trucks, 1/10 scale TC, Rock Racers, Rally - if it had wheels, he's raced it! He's also worked on both sides of the industry fence; collaborating with many major manufacturers (as well as being a sponsored driver) to working for a high-profile industry magazine. During this time he has learned many tricks, tips and techniques and is sharing that knowledge on CompetitionX - the most informative RC website on the internet!

 We’ll be using shock fluid in this step so it’s a good idea to have some paper towels or rags handy. Also, you might want to put something down on your workspace before building. You don’t want your mom/girlfriend/wife pissed when you get shock fluid all over her nice table.