Wrapping up the Tamiya CC-02 build, we’ll be installing the front and rear bumper, body mounts and wheels and tires. Again, the body wasn’t quite done for this build so we’ll be skipping that until a later time.
Build Notes:
 While the kit says not to glue the wheels to the tires, I find that they fall off a lot less if they are glued. CA glue is the way to go, just be careful with it!
While the kit says not to glue the wheels to the tires, I find that they fall off a lot less if they are glued. CA glue is the way to go, just be careful with it!
Step 1:

Assemble the front bumper…
Assemble the front bumper…
Step 2:

…and attach it to the CC-02.
…and attach it to the CC-02.
Step 3:

Assemble the rear bumper.
Assemble the rear bumper.
Step 4:

Key the rear bumper to the aluminum frame rails. Bend down the plastic quick-release battery tray and slide the rear bumper into place.
Key the rear bumper to the aluminum frame rails. Bend down the plastic quick-release battery tray and slide the rear bumper into place.
Tamiya has provided this optional quick-release function but I can only imagine it working if you had a body that didn’t have a back to it.
Step 5:

Fit the tires to the wheels. As mentioned before, the manual states not to glue them together, but that just doesn’t make sense to me. I say do it.
Fit the tires to the wheels. As mentioned before, the manual states not to glue them together, but that just doesn’t make sense to me. I say do it.
Step 6:

Press a bearing onto the front axle, then insert a 10mm pin into the hole in the axle. Slide and key the plastic wheel hex to the pin.
Press a bearing onto the front axle, then insert a 10mm pin into the hole in the axle. Slide and key the plastic wheel hex to the pin.
Attach the tire and secure with the 4mm flange lock nut. Complete both sides.
Step 7:

Moving to the rear, slide a 10mm pin into the hole in the axle followed by the plastic wheel hex (key this to that pin).
Moving to the rear, slide a 10mm pin into the hole in the axle followed by the plastic wheel hex (key this to that pin).
Attach the tire and secure with the 4mm flange lock nut. Complete both sides.
Step 8:

Attach the front body mounts.
Attach the front body mounts.
Step 9:

Attach the rear body mounts.
Attach the rear body mounts.
Step 10:

Last, but not least, install the rear body mount support.
Last, but not least, install the rear body mount support.
And that’s it – you’ve completed the build of your Tamiya CC-02 chassis! All that’s left is to wrap up the body and you’re ready to hit the trails!
Use the links below to follow each step.
Tamiya CC-02 Trail Truck Build – Opening Page
Tamiya CC-02 Trail Truck Build – Part 1 – Transmission
Tamiya CC-02 Trail Truck Build – Part 2 – Chassis
Tamiya CC-02 Trail Truck Build – Part 3 – Driveshafts
Tamiya CC-02 Trail Truck Build – Part 4 – Front Axle
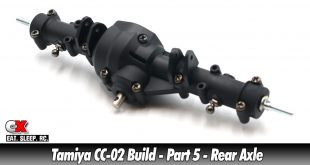
Tamiya CC-02 Trail Truck Build – Part 5 – Rear Axle
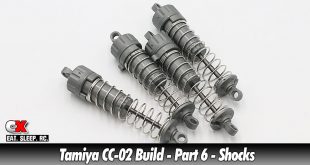
Tamiya CC-02 Trail Truck Build – Part 6 – Shocks
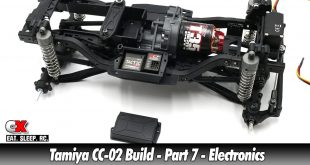
Tamiya CC-02 Trail Truck Build – Part 7 – Electronics
Tamiya CC-02 Trail Truck Build – Part 8 – Final Steps
Tamiya CC-02 Trail Truck Build – Opening Page
Tamiya CC-02 Trail Truck Build – Part 1 – Transmission
Tamiya CC-02 Trail Truck Build – Part 2 – Chassis
Tamiya CC-02 Trail Truck Build – Part 3 – Driveshafts
Tamiya CC-02 Trail Truck Build – Part 4 – Front Axle
Tamiya CC-02 Trail Truck Build – Part 5 – Rear Axle
Tamiya CC-02 Trail Truck Build – Part 6 – Shocks
Tamiya CC-02 Trail Truck Build – Part 7 – Electronics
Tamiya CC-02 Trail Truck Build – Part 8 – Final Steps