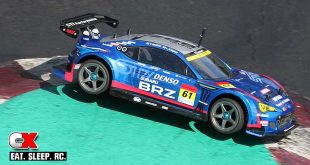
The Build – Part 3
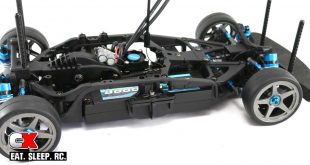
The motor mount assembly on the Tamiya TA07 Pro is quite unique. It has three different possible mounting positions, allowing for three very different handling options. To accommodate this, a single, serpentine belts is used, wrapping its way around a series of pulleys.
 As with almost every car, Tamiya uses a .06 Mod gear pitch for the spur and pinion. This is great if you have a bunch of Tamiya pinions (or spur gears) lying around to adjust the ratio, but if you don’t (like me), then you need to switch to something else. For the build I’ll be using the Tamiya gears, but shortly after Part 3 of the build I swapped them over to 64P – I have a TON of these gears so making gear changes will be much easier for me.
The pulley tensioner and belt tensioner can be adjusted to tighten up or loosen the belt tension. Start with the manual-suggested locations. If you want a bit more speed, loosen both tensioners so the belt has more slack.

Start off by attaching the spur gear to the aluminum hub. It only attaches in one direction so you can’t build this incorrectly.

Assemble the spur gear shaft and pulley. Note the ‘slots’ in the blue spur gear adapter; they key with ‘ribs’ on this inside of the pulley gear. Also note the flanged bearing location. I would suggest a very small dab of blue threadlocker on the retaining screw as well.

Here is the assembly when complete.

Assemble the pulley tensioner. The first step is to glue the two pulley halves together; use CA glue but be careful not to use to much. You don’t want the glue to ‘ooze’ onto the flat spot of the tensioner where the belt comes in contact. I would also suggest a light dab of threadlocker on the retaining screw.

Assemble the last belt tensioner. Note the orientation of the large black spacer. Do not overtighten.

Attach the two chassis mounts to the motor plate. Attach the pulley tensioner to the motor plate (manual location – in the middle of the slot).

Attach the spur gear assembly to the motor mount.

Attach the belt tensioner to the motor mount (the manual location – in the middle of the slot).
Looking good! Let’s move on to the differentials.
Tamiya TA07 Pro Build – Part 1 – Rear Suspension
Tamiya TA07 Pro Build – Part 2 – Front Suspension
Tamiya TA07 Pro Build – Part 3 – Motor Mount
Tamiya TA07 Pro Build – Part 4 – Differentials
Tamiya TA07 Pro Build – Part 5 – Motor Mount / Drive Belt
Tamiya TA07 Pro Build – Part 6 – Steering
Tamiya TA07 Pro Build – Part 7 – Knuckles / Rear Hubs
Tamiya TA07 Pro Build – Part 8 – Shocks
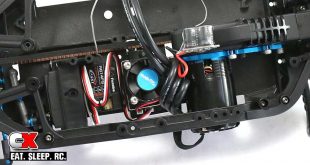
Tamiya TA07 Pro Build – Part 9 – Electronics
Tamiya TA07 Pro Build – Part 10 – Wheels / Body Mounts / Battery Tray