The Build – Part 2
Part 2 of the Team Associated B44.3 build has us assembling the front and rear gearboxes; installing the diffs and building the center CVAs.
Build Notes: You’ll want to pay close attention to the build steps as there are 3 different length CVA bones and 3 different axle designs. I’ve specified which go where a little better than the manual; it’s the pictures aren’t 100% descriptive.
When building the CVAs, AE has included a CVA pin retainer that keeps the pin in place from falling out. Make sure, when you’re installing it, that the ‘gap’ in the retainer is NOT where the pin is located. Rotate the retainer until the ‘gap’ is roughly 90° from the pin. As an added security measure, you can install the set screws provided.
Be ready for some frustration when installing the sun gear on the center CVAs. Once you get the gear on, you need to force the e-clip into the groove on the shaft. It’s a major pain and I destroyed (or lost) about 7 e-clips trying to complete this step. I would HIGHLY suggest finding a few extra e-clips before starting this step.
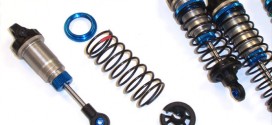
Team Associated B44.3 Buggy Build Step 18
The first thing we need to do is separate the CVAs so you know which ones go where. The three on the left; two are the front axles, the third is the front-center CVA. The long one in the middle is for the rear-center CVA build and the two shortest ones are for the rear axles.
Team Associated B44.3 Buggy Build Step 19
You’ll also want to be familiar with the threaded axles. The longer ones on the left are for the rear, the shorter ones on the right are for the front.
Team Associated B44.3 Buggy Build Step 20
Start by sliding the CVA barrel into place and adding some black grease for lubrication.
Team Associated B44.3 Buggy Build Step 21
Slide a front axle over the ball and slide the pin through. It should feed through the axle and hole in the CVA barrel.
Team Associated B44.3 Buggy Build Step 22
Once the pin is flush in the assembly, slide the CVA pin retainer ring over as shown. Again, make sure the ‘gap’ isn’t sitting where the pin is. You can also insert the setscrew at this point. Build two front and two rears; remember to match up the bones and axles as we mentioned in the Build Notes.
Team Associated B44.3 Buggy Build Step 23
Here is how your completed front/rear CVAs should look.
Team Associated B44.3 Buggy Build Step 24
The final two axles look quite different; in fact, the ends don’t have threads. These are the axles for the center CVAs. Both are the same so we don’t need to worry about a front or back one.
Team Associated B44.3 Buggy Build Step 25
Using the same method as above, build the two center CVAs. Note that one will be longer overall than the other; the longer one goes to the rear.
Team Associated B44.3 Buggy Build Step 26
Build the center CVA as follows: Shim, bearing, bearing, shim, sun gear. Once you get that part done, you’ll want to fit the e-clip into the groove on the shaft.
Team Associated B44.3 Buggy Build Step 27
Here’s a close-up of the fun times you’re about to have. As I said before, this is not easy and will result in a little frustration but stick with it … you’ll get it in there. The good news is you get to build two of these.
Team Associated B44.3 Buggy Build Step 28
Here is what your completed center CVA assemblies should look like.
Team Associated B44.3 Buggy Build Step 29
We are now going to assemble the gearboxes. There are two ways to do this; one if you are building the B44.3 in saddle-pack configuration and another if you are building it in the shorty-pack configuration. I will be using the shorty pack config so that’s how the steps will be. First, drop the gear diff into the lower gearbox half.
Team Associated B44.3 Buggy Build Step 30
Apply a small drop of black grease to the center CVA sun gear and set it into place on the lower gearbox half. Drop the top gearbox half into position and screw together. Spin the CVA to make sure the assembly spins smoothly and without any binding. If there is binding, open the gearbox back up, pull the diff out and remove one shim off the differential. You’ll want to experiment with which side; removing a shim from the gear side will also open the gear mesh between the diff gear and the input shaft gear. Removing a shim from the opposite side will keep the gear mesh tighter.
Team Associated B44.3 Buggy Build Step 31
A final look at our gearbox assemblies. Set these aside. Good job.
Tony Phalen -
As an avid RC enthusiast, Tony has been building, bashing and racing RC Cars for over 30 years. He has participated in every kind of surface racing events - 1/18 scale trucks, 1/10 scale TC, Rock Racers, Rally - if it had wheels, he's raced it! He's also worked on both sides of the industry fence; collaborating with many major manufacturers (as well as being a sponsored driver) to working for a high-profile industry magazine. During this time he has learned many tricks, tips and techniques and is sharing that knowledge on CompetitionX - the most informative RC website on the internet!

 You’ll want to pay close attention to the build steps as there are 3 different length CVA bones and 3 different axle designs. I’ve specified which go where a little better than the manual; it’s the pictures aren’t 100% descriptive.