The Build – Part 7
In Part 7 of our Team Associated B44.3 build, we’ll be assembling the outer suspension parts, the turnbuckles and connecting the two together.
Build Notes: None.
Team Associated B44.3 Buggy Build Step 79
Building turnbuckles can be a pain in the butt, but thankfully there are a few tools that make this task easier. Duratrax offers this ball end driver that holds onto the ball cup, making it easier to screw onto the turnbuckle. There are also a myriad of quality turnbuckle wrenches on the market that will make this job easier. I’ve listed some at the bottom of this post.
Team Associated B44.3 Buggy Build Step 80
The next step is to separate the turnbuckles. As you see, there are 4 2″ turnbuckles and 2 1.77″ ones. The 4 longer ones are for the front and rear camber while the 2 shorter ones are for the steering. Just make sure you use the right ones during the right steps.
Team Associated B44.3 Buggy Build Step 81
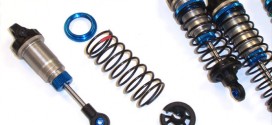
Assemble the 6 turnbuckles as shown, using the lengths suggested in the manual. I started with these lengths but did manipulate them once I got running on the track. After you build them keep the separated; they are build as a left and right for their intended location.
Team Associated B44.3 Buggy Build Step 82
Press a locknut into the bottom of the steering arm and screw the silver ball stud in. Don’t forget your foam thingy.
Team Associated B44.3 Buggy Build Step 83
Press two bearings into each steering arm. Insert the crush tube in between them.
Team Associated B44.3 Buggy Build Step 84
Slide your assembled front axle through the steering arm. Press the drive hex onto the axle, with the notches facing out, and secure it in place with the drive pin.
Team Associated B44.3 Buggy Build Step 85
Assemble the pair of caster blocks as shown. Both blocks are the same, just be sure to build them as a left and right.
Team Associated B44.3 Buggy Build Step 86
Carefully fit the two hat washers into position in the steering arm. They will fall out quite easily so be sure to keep the arm sideways at all times.
Team Associated B44.3 Buggy Build Step 87
Slide the caster block into position, keeping an eye on the hat washers to make sure they stay in place. Secure the caster block with the pair of 7/16″ screws. Do not overtighten … the steering arm should swivel back and forth with ease.
Team Associated B44.3 Buggy Build Step 88
Attach the steering arm assembly to the front arm by sliding the hinge pin into place. Secure the hinge pin with the 2-56 screw. Not the orientation of the steering arm.
Team Associated B44.3 Buggy Build Step 89
Find your front camber link turnbuckle and pop them into place (you did keep them separate, right?).
Team Associated B44.3 Buggy Build Step 90
Find your steering link turnbuckles and pop them into place as well. Make sure the notches in the turnbuckles are all facing the same way.
Team Associated B44.3 Buggy Build Step 91
The rear hubs use molded camber link towers for adjustment. AE includes two of them; an A and a B tower. Grab both A towers (but keep the B’s in case you want to make any changes at the track).
Team Associated B44.3 Buggy Build Step 92
Insert the bearings and crush tubes into the rear hubs.
Team Associated B44.3 Buggy Build Step 93
Assemble your rear hubs as shown using the A towers.
Team Associated B44.3 Buggy Build Step 94
Add 3 3/16 shims to the rear axle and slide it though the hub assembly, followed by another 3/16 shim and finally the roll pin.
Team Associated B44.3 Buggy Build Step 95
Slide the 12mm clamping hex onto the shaft and key it to the roll pin. Use the 2-56 screw to pin the hex into place.
Team Associated B44.3 Buggy Build Step 96
Attach your rear hub assembly to the rear suspension arm using the rear hinge pin. You’ll be adding a pair of wheelbase washers as well, both behind the hub. Use the 2-56 screw to capture the rear hinge pin.
Team Associated B44.3 Buggy Build Step 97
Find your rear camber link turnbuckles and pop them into place, matching their direction to the front (using the notches).
Nice long step but we got a lot accomplished. Double check your suspension to make sure everything swings freely.
Here are a few items that will make this build (and future builds) a little bit easier.
Tony Phalen -
As an avid RC enthusiast, Tony has been building, bashing and racing RC Cars for over 30 years. He has participated in every kind of surface racing events - 1/18 scale trucks, 1/10 scale TC, Rock Racers, Rally - if it had wheels, he's raced it! He's also worked on both sides of the industry fence; collaborating with many major manufacturers (as well as being a sponsored driver) to working for a high-profile industry magazine. During this time he has learned many tricks, tips and techniques and is sharing that knowledge on CompetitionX - the most informative RC website on the internet!

 None.
None.