The Build – Part 2
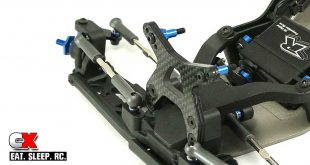
The Team Associated B6D has gone away from the gullwing front arms and now uses a flat-arm design. It still retains the caster block inserts, but replaced the axle-height shims with a much more user-friendly dual-height aluminum insert.
 The only issue I found during this install step was the manual marking the caster hat bushing; it states: Top: 1mm, Bottom: 2mm. This contradicts the actual drawing though, but the correct install is to put the 2mm bushing on top.
Let’s start the front suspension off easy – install the two M2x4mm screws into the suspension arms. Note the orientation.

Slide one suspension arm in place, making sure you set the hinge pin brace in between the arm and bulkhead (see red arrow), then slide the hinge pin through. Do the same for the opposite side. Insert the 3mm set screws into the bulkhead to capture the hinge pin. Do not overtighten.

Install the front bumper.

Insert a 5×10 bearing into each side of the steering block. Insert the aluminum front axle and capture it with the 6mm screw (threadlocker is suggested here). Note the orientation of the steering block.
Attach the steering block arm to the steering block, also noting its orientation. Finally, attach the 8mm ballstud and 2mm washer. Build the left and right sides.

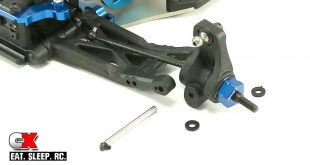
The caster block uses inserts for adjustment; there’s a 0°, 2.5° and 5° pair. Also notice the raised tab (red arrow). These key into the steering block and can be inserted either with the tab up or down to further change the caster setting. We’ll be using the 5° up (I’ve highlighted the numbers so you can see where they are on the inserts).

Install the 10mm ballstud into the caster block, using the inside hole. Insert the 2mm caster hat bushing (in the top) and the 1mm caster hat bushing (in the bottom) into the caster block, then slide the assembled steering arm in between and secure with the pair of 14mm screws. Build both sides.

The final part of the front suspension install is to attach the assembled steering block to the suspension arms. Slide the hinge pin through the arm, the plastic caster block spacer and then the assembled steering block. Insert the M2x4mm screw to capture the hinge pin.
Before moving on, give everything a quick swing to make sure it moves freely. The next step is the first part of the rear suspension – yes, there’s two parts. Go get a drink.
Team Associated B6D Build – Part 1 – Steering – Servo
Team Associated B6D Build – Part 2 – Front Suspension
Team Associated B6D Build – Part 3 – Rear Suspension Part 1
Team Associated B6D Build – Part 4 – Gearbox
Team Associated B6D Build – Part 5 – Rear Suspension Part 2
Team Associated B6D Build – Part 6 – Turnbuckles – Shock Towers
Team Associated B6D Build – Part 7 – Shocks
Team Associated B6D Build – Part 8 – Electronics