The Build – Part 7
The V2 12mm Big Bore shocks are used on the Team Associated B6D. These have always been some of my favorite shocks both in build and smooth operation. Time to get building!
 Building shocks can be a messy experience, so I suggest having a clean space with some sort of covering in case things get chaotic. I would also suggest having some sort of shock stand available to set them aside during building.
When it comes time to build shocks, I always assemble the o-rings first. If you wait further down the road, you can sometimes get oil on the o-rings which makes them 100x harder to install, especially in the collars. Dry is better, trust me on this. With that, install a large o-ring in the threaded collar and top of the shock; install the smaller o-ring over the bottom of the shock.

Well would you look at that, non-white shock pistons. It’s the little things, but this has to be one of my favorite upgrades – I can actually read the numbers on the pistons without having to Sharpie them! Ok, back to the build. Attach the 1.6 pistons to the front (short) shock shafts, and the 1.7 pistons to the rear (long) shock shafts. Add two .030 spacers to each front shaft.

Assemble the lower shock cartridges in this order: V2 shock hat bushing, clear X-ring, V2 shock spacer, clear X-ring and another V2 shock hat bushing. Make sure the hat bushings are assembled as shown. A drop of shock oil will help the parts slide into the shock body easier. Screw on a blue shock bottom cap.

Take your shock shafts and insert them into the shock bodies; short shafts – short bodies, long shafts – long bodies. A drop of shock oil on the threads will help the shaft slide through the body easier. Press the pivot balls into four long shock eyelets and then screw the eyelets onto the shock shaft.

Fill all four shock with oil to the top. Slowly slide the shaft up and down to release any air from under the piston, then refill to the top again. Let them sit until there are no more air bubbles in the oil.
Using the M2x4mm screw, pre-drill the bleeder hole in all four shock caps. Place a drop of oil in the cap and screw it onto the shock. Slowly compress the shock, allowing any overflow oil to seep out of the bleeder hole. Once fully compressed, insert the M2x4mm screw. Wipe any excess oil off the shocks.
Screw the threaded collars onto the shocks, setting them at the kit specified 4mm (front) and 2mm (rear). Slide the springs on (white-front, green-rear) followed by the 5mm spring cups to the bottom of the shocks.

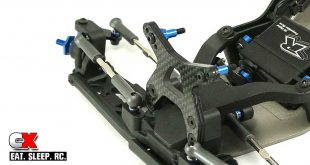
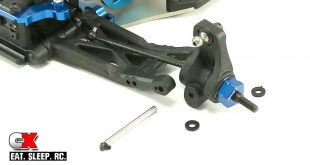
Attach the front shocks, outside hole on the arm.

Attach the rear shocks, inside hole on the arm.
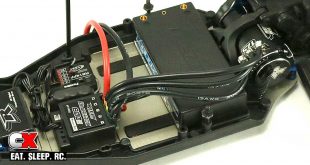
The V2 Big Bores have now been installed. On to the final step – the electronics.
Team Associated B6D Build – Part 1 – Steering – Servo
Team Associated B6D Build – Part 2 – Front Suspension
Team Associated B6D Build – Part 3 – Rear Suspension Part 1
Team Associated B6D Build – Part 4 – Gearbox
Team Associated B6D Build – Part 5 – Rear Suspension Part 2
Team Associated B6D Build – Part 6 – Turnbuckles – Shock Towers
Team Associated B6D Build – Part 7 – Shocks
Team Associated B6D Build – Part 8 – Electronics