Thursday , 28 March 2024

Team C TM4 Buggy Build – Part 6 – Top Decks

Team C TM4 Buggy Build – Part 6 – Top Decks

The Build – Part 6
The TM4 uses a dual top deck with a center aluminum bulkhead cap. This allows for easier maintenance than a car will a full top deck. We’ll also be installing the front and rear shock towers and wing mounts.

Build Notes:
If you choose, you can seal the edges of the carbon fiber top decks and shock towers with CA glue. This helps keep them from delaminating in the event of a crash.

Because of the way the battery mounts, I had to dremel a pretty serious notch in the rear top deck to allow the plugs to attach to the battery. This shouldn’t be a bit issue with handling but be aware that if you do have a big crash, this could potentially be a weak point in the car’s backbone.

Team C TM4 Buggy Build Step 46
Assemble the front top deck, making sure the antenna mount is positioned on the left side of the deck. Place the two orange spacers on the steering posts and attach the top deck to the chassis.

Team C TM4 Buggy Build Step 47
Assemble the rear top deck and attach it to the chassis. As you can see, I’ve had to notch the piece quite a bit to get the battery plugs to reach the battery. I would test fit whatever battery you are using to see how much you’ll need to do this. I could have reversed the battery to have the plugs up front, but then the notch would be closer to the attachment point; I figure this would make that point much weaker than having the notch more in the middle.

Team C TM4 Buggy Build Step 50
Bolt the aluminum cap onto the center bulkheads. It does have a top and bottom so make sure you test fit it prior to screwing it in place.

Team C TM4 Buggy Build Step 51
Attach the front shock tower to the front gearbox.

Team C TM4 Buggy Build Step 52
Attach the wing mounts to the rear shock tower. You can attach the mounts to either side; the tower is not directional.

Team C TM4 Buggy Build Step 53
Attach the rear tower to the rear gearbox, making sure the wing mounts are to the rear of the car.

Pretty easy step! Next up is the suspension.

Team C TM4 Buggy Build – Part 1 – Main Chassis Prep
Team C TM4 Buggy Build – Part 2 – Differentials
Team C TM4 Buggy Build – Part 3 – Gearboxes
Team C TM4 Buggy Build – Part 4 – Center Clutch
Team C TM4 Buggy Build – Part 5 – Steering
Team C TM4 Buggy Build – Part 6 – Top Deck/Shock Towers
Team C TM4 Buggy Build – Part 7 – Front Suspension
Team C TM4 Buggy Build – Part 8 – Rear Suspension
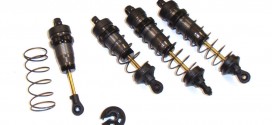
Team C TM4 Buggy Build – Part 9 – Shocks
Team C TM4 Buggy Build – Part 10 – Electronics
Team C TM4 Buggy Build – Part 11 – Wheels, Tires, Body

Back to the Team C TM4 Buggy Build List

About Tony Phalen

Tony Phalen - As an avid RC enthusiast, Tony has been building, bashing and racing RC Cars for over 30 years. He has participated in every kind of surface racing events - 1/18 scale trucks, 1/10 scale TC, Rock Racers, Rally - if it had wheels, he's raced it! He's also worked on both sides of the industry fence; collaborating with many major manufacturers (as well as being a sponsored driver) to working for a high-profile industry magazine. During this time he has learned many tricks, tips and techniques and is sharing that knowledge on CompetitionX - the most informative RC website on the internet!

Check Also

Video: Tamiyas Toyota Supra on the BT-01 Chassis - First Drive | CompetitionX

Video: Tamiya’s Toyota Supra on the BT-01 Chassis – First Drive | CompetitionX

There is alot of buzz surrounding the new BT-01 chassis from Tamiya. This is mainly …