Like the rear, the front suspension on the Tekno ET410 is quite macho. Thick parts, aluminum bits and another anti-roll bar – all standard equipment.
Build Notes:
 In this step, there are two different length setscrews; a 3mm and a 4mm. Make sure, in Step 8, you are using the 3mm setscrew. If you use the 4mm one, your wheels will not fit on the hexes.
In this step, there are two different length setscrews; a 3mm and a 4mm. Make sure, in Step 8, you are using the 3mm setscrew. If you use the 4mm one, your wheels will not fit on the hexes.
When attaching the turnbuckles, make sure the ‘notch’ is to the left side of the car. If all of the notches are to the left, it makes it easy to understand which way to twist the turnbuckle to make adjustments.
The additional setscrew in Step 11 is there to make sure that hole does not deform while using the inside hole. Should you move the ballend to the outside hole, make sure you insert the M3x4mm setscrew into the unused hole.
Step 1:

Assembly of the front anti-roll bar is just like the rear; only difference is you’ll be pressing balls into the bottom hole of the plastic links instead of ballstuds. You can use that for reference if you need a step-by-step here.
Assembly of the front anti-roll bar is just like the rear; only difference is you’ll be pressing balls into the bottom hole of the plastic links instead of ballstuds. You can use that for reference if you need a step-by-step here.
Step 2:

Attaching it to the bulkhead, same as the rear.
Attaching it to the bulkhead, same as the rear.
Step 3:

Two aluminum arm mounts; the one on the left is the ‘B’ block, the one on the right is the ‘A’ block. Low-dot pill in the ‘B’ block, high-dot pill in the ‘A’ block.
Two aluminum arm mounts; the one on the left is the ‘B’ block, the one on the right is the ‘A’ block. Low-dot pill in the ‘B’ block, high-dot pill in the ‘A’ block.
Step 4:

Insert the Droop screws into the arms. Again, we’ll ‘set’ them at the end of the build.
Insert the Droop screws into the arms. Again, we’ll ‘set’ them at the end of the build.
Step 5:

Attach the ‘B’ arm mount to the bulkhead, press the hinge pin in place followed by the suspension arm (note the orientation), 3 shims (2 thin, 1 thick) and then the ‘A’ arm mount.
Attach the ‘B’ arm mount to the bulkhead, press the hinge pin in place followed by the suspension arm (note the orientation), 3 shims (2 thin, 1 thick) and then the ‘A’ arm mount.
Step 6:

Slide the anti-roll bar link into the gap in the arm and secure with the M3x20mm screw.
Slide the anti-roll bar link into the gap in the arm and secure with the M3x20mm screw.
Step 7:

Assemble the rear axles.
Assemble the rear axles.
Step 8:

Press the bearings into the steering blocks. Slide the axles through the blocks followed by the shim and axle pin. Key the wheel hex to the axle pin and lock in place with the M3x3mm setscrew.
Press the bearings into the steering blocks. Slide the axles through the blocks followed by the shim and axle pin. Key the wheel hex to the axle pin and lock in place with the M3x3mm setscrew.
Step 9:

Key the steering blocks to the caster blocks and screw the steering block screws into place. Do not overtighten – a snug fit will do. Using the M3x4mm set screws (make sure they are the 4mm ones), feed them into the holes (one marked with the red arrow) and tighten until there is a snug fit. Do not overtighten these either.
Key the steering blocks to the caster blocks and screw the steering block screws into place. Do not overtighten – a snug fit will do. Using the M3x4mm set screws (make sure they are the 4mm ones), feed them into the holes (one marked with the red arrow) and tighten until there is a snug fit. Do not overtighten these either.
Step 10:

Set the steering assembly into place as shown and insert the hinge pin. Lock the hinge pin in place with the M3x4mm screw. You will also need to insert another M3x4mm setscrew into the bottom of the steering block to help capture the hinge pin; a snug fit here is all that’s needed.
Set the steering assembly into place as shown and insert the hinge pin. Lock the hinge pin in place with the M3x4mm screw. You will also need to insert another M3x4mm setscrew into the bottom of the steering block to help capture the hinge pin; a snug fit here is all that’s needed.
Step 11:

Insert the 8mm ballend and M3x4mm setscrew into the top of the caster block.
Insert the 8mm ballend and M3x4mm setscrew into the top of the caster block.
Step 12:

Press the locknut into the bottom of the steering arm and feed the 10mm ball end into place. Make sure to include four of the shims.
Press the locknut into the bottom of the steering arm and feed the 10mm ball end into place. Make sure to include four of the shims.
Step 13:

Build more turnbuckles. The manual lenghts are a good starting point.
Build more turnbuckles. The manual lenghts are a good starting point.
Step 14:

Assemble the camber link brace (use the upper holes). Pop the steering turnbuckles on from Step 13. Make sure the ‘notches’ are pointing to the left side of the car.
Assemble the camber link brace (use the upper holes). Pop the steering turnbuckles on from Step 13. Make sure the ‘notches’ are pointing to the left side of the car.
Step 15:

Attach the body posts to the shock tower. Note the orientation of the tower.
Attach the body posts to the shock tower. Note the orientation of the tower.
Step 16:

Pop the steering links from Step 13 into place. Using the camber link plate, sandwich the shock tower to the front bulkhead.
Pop the steering links from Step 13 into place. Using the camber link plate, sandwich the shock tower to the front bulkhead.
Step 17:

Pop the remaining camber link ends on to the open caster block ballstuds. This is a good time to double check that your ‘notches’ are all facing the left side of the car.
Pop the remaining camber link ends on to the open caster block ballstuds. This is a good time to double check that your ‘notches’ are all facing the left side of the car.
Ok – done with the major build parts. Time to start attaching it all to the chassis!
Use the links below to follow each step.
Tekno ET410 Truggy Build – Opening Page
Tekno ET410 Truggy Build – Part 1 – Differentials
Tekno ET410 Truggy Build – Part 2 – Front Bulkhead
Tekno ET410 Truggy Build – Part 3 – Rear Bulkhead
Tekno ET410 Truggy Build – Part 4 – Rear Suspension
Tekno ET410 Truggy Build – Part 5 – Front Suspension
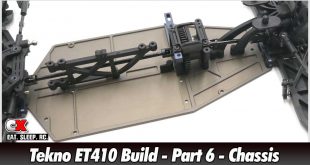
Tekno ET410 Truggy Build – Part 6 – Chassis Assembly
Tekno ET410 Truggy Build – Part 7 – Shocks
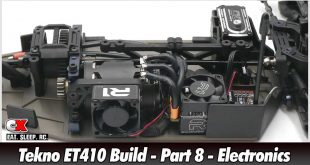
Tekno ET410 Truggy Build – Part 8 – Electronics
Tekno ET410 Truggy Build – Part 9 – Final Assembly
Tekno ET410 Truggy Build – Opening Page
Tekno ET410 Truggy Build – Part 1 – Differentials
Tekno ET410 Truggy Build – Part 2 – Front Bulkhead
Tekno ET410 Truggy Build – Part 3 – Rear Bulkhead
Tekno ET410 Truggy Build – Part 4 – Rear Suspension
Tekno ET410 Truggy Build – Part 5 – Front Suspension
Tekno ET410 Truggy Build – Part 6 – Chassis Assembly
Tekno ET410 Truggy Build – Part 7 – Shocks
Tekno ET410 Truggy Build – Part 8 – Electronics
Tekno ET410 Truggy Build – Part 9 – Final Assembly