The Build – Part 7
As mentioned earlier, Tamiya uses TRF419 suspension parts on the TA07 Pro. In addition, universal drive shafts are located at all four corners as are blue aluminum ball ends and spacers. High-quality bearings are also used for super smooth rolling action.
 The hinge pins that go through the caster blocks and rear hubs have a flat spot on them and use a set screw to secure them. There is a thin sheet of plastic that blocks this set screw hole, so you’ll need to break through that plastic before inserting the set screw.
We start off this step by assembling all four universal drive axles. Slip the barrel into the dogbone, apply some black grease and fit it into the axle. Slide the cross pin through the holes in both the axle and barrel.

Tamiya uses a keyed ‘hoop’ to secure the cross pin. The easiest way to install this is to ‘catch’ the hole with the hooked end and slowly feed the hoop (hooked end first) into the groove. Sounds complicated, very easy to do. Build four.

Insert the blue ball end into the steering arm (from the bottom), then insert a bearing and the assembled universal drive axle. Build the other side, just make sure it’s facing in the opposite direction.

Before inserting the hat bushings into the caster blocks, take note that they are different in size; short and tall. The short one will go into the upper hole, the tall one into the lower hole.

Once you’re inserted the hat bushings, slide the universal axle through the caster block, then align the holes and secure with the 3x10mm screw (at the bottom) and 5x8mm ball stud up top. Don’t forget the .5mm blue washer on top.

Insert the set screw into the hole on the bottom of the caster block; only feed it in a short ways. Slip the assembled steering arm into the suspension arm, then insert the hinge pin. Note the flat spot on the pin; it should be facing down so when you tighten the set screw, it can lock the hinge pin in place. Pop the steering links onto the steering arm, then build and install the camber links. The arrow is pointing out the blue washer – make sure you have installed it here.

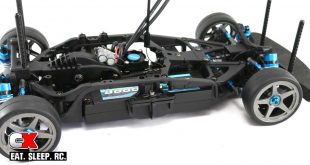
Here is a look at the completed from end.

Moving to the rear, attach the rear chassis braces.

Build both rear hubs; start by inserting the 3x10mm set screw into the rear hub followed by the 1mm silver shim and blue ball connector. Press the bearing into the hub (from the back) and slide the universal axle into place.

Insert the set screw into the hole on the bottom of the caster block; only feed it in a short ways. Slip the assembled rear hub into the suspension arm, then insert the hinge pin making sure to include a wheelbase shim on both sides of the hub. Note the flat spot on the pin; it should be facing out towards the set screw. Tighten down the set screw. Build and install the camber link; match the direction of the notch on the turnbuckle with those on the front of the car.
Before moving on, make sure the suspension moves freely up and down. When you’re happy with it, we can move on to the next step – the shocks.
Tamiya TA07 Pro Build – Part 1 – Rear Suspension
Tamiya TA07 Pro Build – Part 2 – Front Suspension
Tamiya TA07 Pro Build – Part 3 – Motor Mount
Tamiya TA07 Pro Build – Part 4 – Differentials
Tamiya TA07 Pro Build – Part 5 – Motor Mount / Drive Belt
Tamiya TA07 Pro Build – Part 6 – Steering
Tamiya TA07 Pro Build – Part 7 – Knuckles / Rear Hubs
Tamiya TA07 Pro Build – Part 8 – Shocks
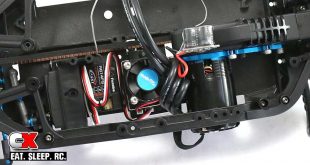
Tamiya TA07 Pro Build – Part 9 – Electronics
Tamiya TA07 Pro Build – Part 10 – Wheels / Body Mounts / Battery Tray