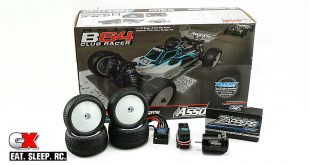
The Build – Part 10
Large, V2 12mm Big Bore threaded aluminum shocks are included with the Team Associated B64 Club Racer. These shocks feature 3mm shafts and super smooth X-rings for excellent rough-terraing handling.
 Shock building = messy. I suggest a clean environment as well as some rags or towels to wipe up any mishaps you might have during the building process.
During Step 10, you will have oil oozing out on to the outside of your shocks. If you’re like me, simply wiping it off just won’t do. You can use a spritz of motor cleaner to help remove the oil, leaving you a nice shiny shock!

Before I get started, I like to separate all my parts to make the build a little smoother. On the left are the front aluminum bodies, 23mm shafts and 5mm offset spring cups. On the right, rear bodies, 27.5mm shafts and 0mm offset spring cups.

Another thing I like to do in the beginning is seat all of the o-rings. This makes it easier to install them while you fingers (and the o-rings) are free from oils.

Alright, on to the build. On the left we have the front shock shaft built with 1.5 pistons and two .030 plastic spacers. On the right, the rear shock shafts with 1.7 pistons. A light drop of blue threadlocker is suggested to keep the screws firmly in place.

Installing the bottom cartridge parts can be a little messy, so I’ve found an easy way to do it. Slide the parts onto one of your wrenches in the order they are to be installed, coat with a light drop of shock fluid and slide them into the bottom of the shock. Super easy with virtually no mess.

Capture the cartridge parts with the bottom blue shock cap.

Coat the threads of your shock shafts with a drop of shock fluid and insert them into the shock body. Make sure you insert the 23mm shafts into the short front bodies and the 27.5mm shafts in to the longer rear bodies.
Press a pivot ball into each shock eyelet and screw them onto the shock shaft (kit: front shocks, long eyelet – rear shocks, short eyelet).

Before filling with oil, I suggest installing the shock collars. Depending on what shock stand you are using, this will help keep them stable in the stand.
Fill each shock with oil, plunging the shaft up and down to help remove any air bubbles. Set them aside in your shock stand and wait a few minutes for the air bubbles to clear.

While you’re waiting, go ahead and pre-tap the bleeder holes in the shock caps with the M2x4mm screw.

Grab your shock and fill it to the top with oil (so the oil is level with the rim). Put a single drop of oil in the cap as well.

Screw the cap on to the top of the shock. Now, on some sort of rag, slowly compress the shock until it bottoms out. During this time, some oil will flow out of the shock cap – this is normal.
Once fully compressed, insert the M2x4mm screw to seal the hole. Wipe off any extra oil that’s on the outside of the shock.

There you have it – four pretty little shocks are filled, sealed and clean!

Thread the shock collars up to the manual-specified height (8.25mm for the front, 6mm for the rear) and install the springs and spring cups.

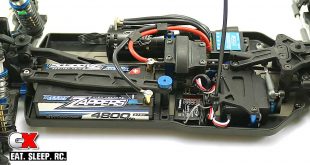
Install the front shocks onto the buggy.

Install the rear shocks onto the buggy.
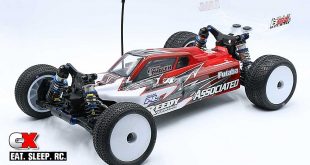
Other than the tires, the shocks are probably the most crucial setup piece of the puzzle. This step was a little longer than most but we got ‘er done! Great job!
Let’s get to the final steps – the electronics and body/wheels/tires!
Team Associated B64 Club Racer Build – Opening Page
Team Associated B64 Club Racer Build – Part 1 – Differentials
Team Associated B64 Club Racer Build – Part 2 – Chassis
Team Associated B64 Club Racer Build – Part 3 – Steering
Team Associated B64 Club Racer Build – Part 4 – Front Bulkhead
Team Associated B64 Club Racer Build – Part 5 – Front Suspension
Team Associated B64 Club Racer Build – Part 6 – Servo
Team Associated B64 Club Racer Build – Part 7 – Rear Bulkhead
Team Associated B64 Club Racer Build – Part 8 – Rear Suspension
Team Associated B64 Club Racer Build – Part 9 – Turnbuckles
Team Associated B64 Club Racer Build – Part 10 – Shocks
Team Associated B64 Club Racer Build – Part 11 – Electronics
Team Associated B64 Club Racer Build – Part 12 – Body, Wheels and Tires