The Build – Part 7
The rear bulkhead build on the Team Associated B64 is very similar to the front; there are only a few minor differences that separate them.
 You’ll get another chance to deal with the finiky input shaft retainer ring. I hope you remember how you installed the first one.
Extra outdrive shims are included to help space your diff to tighten or loosen the gear mesh. I installed 3 shims on each side which made it a little tight, but I figured after a few runs it would probably loosen up a tad. Your experience may vary.

Use the same steps as you did to assemble the front gearbox; bearings, input shaft and retainer ring. The only difference is the C arm mount installation.
Here’s where I found a slight issue; the manual shows a 0° Down pill – I didn’t see any 0° pills. In the rest of the diagrams it shows the pill with the center-pip – it also shows that in the setup at the back of the manual. I disregarded the 0° Down pill option and went with the center-pip version.
However, you’ll notice that they are not installed – they kept falling out so I popped them in at a later step.

Slide the shims on the diff followed by the 10×15 bearings; I used 3 shims on each side.
Set the rear diff in place and capture it with the gearbox cap and 3x10mm screws.

Assemble the rear shock tower, including the wing mounts and body mount, and attach. You can also install the rear anti-roll bar mount.

The B64 has the option to use a long or short rear chassis brace. This changes the flex characteristics at the back of the buggy.
To start out, I installed the kit suggested long brace.

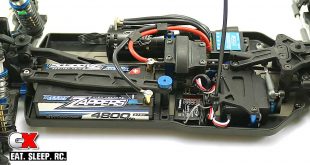
Feed the rear drive bone through the opening in the rear brace and into the input shaft in the gearbox. Place the entire assembly onto the rear of the chassis and secure.
Like the front, it is suggested to use a small amount of black grease on the gearbox screws to help them thread in easier.
At this time, you may just want to give the drivetrain a spin to make sure there is no binding. Other than that, you’re all set to move on!
Team Associated B64 Club Racer Build – Opening Page
Team Associated B64 Club Racer Build – Part 1 – Differentials
Team Associated B64 Club Racer Build – Part 2 – Chassis
Team Associated B64 Club Racer Build – Part 3 – Steering
Team Associated B64 Club Racer Build – Part 4 – Front Bulkhead
Team Associated B64 Club Racer Build – Part 5 – Front Suspension
Team Associated B64 Club Racer Build – Part 6 – Servo
Team Associated B64 Club Racer Build – Part 7 – Rear Bulkhead
Team Associated B64 Club Racer Build – Part 8 – Rear Suspension
Team Associated B64 Club Racer Build – Part 9 – Turnbuckles
Team Associated B64 Club Racer Build – Part 10 – Shocks
Team Associated B64 Club Racer Build – Part 11 – Electronics
Team Associated B64 Club Racer Build – Part 12 – Body, Wheels and Tires