The Tekno EB410.2 can accept most major electronics; tall or short servos and normal sized receivers. Most brushless ESC’s fit as well, however you might need to get creative if they come with external capacitors.
 Chassis space is a little limited for electronics, so I would do a little research before buying.
As mentioned at the beginning of this build, we’re using a R1 Wurks Low-Profile Digital Drive Servo. This particular one also comes with a short servo lead so we won’t have a ton of extra wire getting tangled up.
Step 1 – attach your servo to the mount as shown.

Attach the servo assembly to the chassis. It’s best to route your wire to the opposite side of the buggy now (as you can see I didn’t and had to remount it again at a later time).
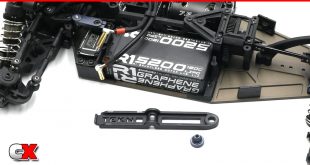
This mount also doubles as the forward battery retainer.

Attach the rear battery retainer to the chassis along with the rear body mount panel.
Attach your motor to the motor mount. I would suggest aligning it up similar to the picture, with the motor tabs facing up.
If you know what pinion you’ll be using, you can add that now as well.

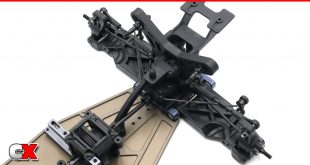
Slide your motor assembly in place. Set your gear mesh and tighten down the M3x10mm screws.

Install your ESC and receiver. You’ll want to make sure both the ESC and receiver are far enough on the chassis that they won’t interfere with the right-side side guard.
It’s also the best time to tidy up your wiring. Once you get the other side guard on, things get pretty tight.

Optional step; if you have a motor fan, you can attach it using the Tekno-supplied motor fan mount.
I had a spare WTF fan (that means Wild Turbo Fan) off of my EB410 that I used on here.

Attach the front side guard and rear body panel.
Another look at the mounted WTF fan.

Build the steering drag link (with a 3mm gap in between).

Assemble the servo horn. This is the only upgrade I made to the EB410 and decided to bring it over to the .2. It’s a Tekno unit (TKR6563A Aluminum 25T Servo Horn) and is a must-have upgrade over the plastic horn.
Buy here: https://amzn.to/3bU5Ygf

Final step is to attach the servo horn, then connect the drag link to the steering rack!
Woo hoo! Tekno EB410.2 is almost complete! Final few steps and we’re ready to get this baby on in the dirt!
Tekno RC EB410.2 4WD Buggy Build – Opening Page
Tekno RC EB410.2 4WD Buggy Build – Part 1 – Differentials
Tekno RC EB410.2 4WD Buggy Build – Part 2 – Steering/Front Bulkhead
Tekno RC EB410.2 4WD Buggy Build – Part 3 – Rear Bulkhead
Tekno RC EB410.2 4WD Buggy Build – Part 4 – Rear Suspension
Tekno RC EB410.2 4WD Buggy Build – Part 5 – Front Suspension
Tekno RC EB410.2 4WD Buggy Build – Part 6 – Chassis Assembly
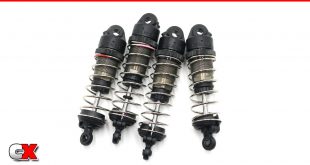
Tekno RC EB410.2 4WD Buggy Build – Part 7 – Shocks
Tekno RC EB410.2 4WD Buggy Build – Part 8 – Electronics
Tekno RC EB410.2 4WD Buggy Build – Part 9 – Final Assembly