The Build – Part 5
Ok, time for some shock action! The Tekno RC EB48.4 comes with a stellar set of dampers. Everything on these shocks is new, from the bodies to the internals. Even the springs are touted as new ‘Low Frequency’ springs. Let’s get ’em built!
 Shock building is always a challenge, so there’s a good chance things might get messy. Make sure your work area is clean and you have some rags handy for clean up.
I’d also suggest some sort of shock stand to hold the shocks while you’re waiting for the bubbles to rise out of the fluid.
While noted in the actual build step, I think it’s important to point out that Tekno uses two different types of lower screws for the shocks; a standard thread and a reverse thread. This helps prevent the screws from backing out when the suspension arms move up and down. See the steps below for actual placement.

Before assembly, let’s take a closer look at the different o-rings included with the shocks. There are three; the smallest ones, used for the bottom of the shocks; the skinny/bigger ones, used with the threaded collars and the thick/bigger ones, made to be installed in the shock caps.
For the first step, go ahead and install the smaller o-rings onto the bottom of the shocks and the ones in the threaded collars.

Now install the thicker o-rings into the shock caps. They should seat all the way down inside.

Tekno’s shocks use a bottom cartridge design; everything installs from the bottom of the shock. I’ve laid out the pieces in the order they install; use a small drop of shock oil during assembly to allow them to slide into the shock easier.
Also note the orientation of the plastic shock guides.
Once the cartridge pieces are installed, screw on the bottom shock cap. Build all four.

Attach the pistons to the shock shafts. All four pistons are the same for the kit setup, so the only difference is going to be the length of the shock shafts; shorter ones up front, longer in the rear.

Apply a small drop of shock oil to the threaded area of the shock shaft and slowly insert into the shock. Slip the shock boot over the shaft and wrap it over the bottom shock cartridge. Thread on the shock shaft rod end and the threaded spring collar.

Fill the shocks with fluid; the fronts get the 550wt, the rears get 450wt. Slowly move the shock shaft up and down to remove any bubbles from under the piston. Do this a couple times and then set aside to allow all the bubbles to float to the top.
Once the bubbles are gone, add more fluid until it is even with the top of the shock body.

Add one or two drops of fluid into the shock cap and screw it on to the shock. Set the shock on your paper towel and slowly compress it; you will see some of the fluid exit via the bleeder hole in the cap. Once the shock is fully compressed, insert the M2x4 screw into the cap and tighten down. Clean up any excess fluid that is on the outside of the shock.

Feed the springs onto the shocks (shorter black on the front, longer orange on the rear) and secure with the lower spring cups. To prevent the spring cups from falling off, Tekno has added a M3x10 grub screw that runs through the spring cup and the hole in the lower ball cup. Great idea.

Attach the shorter shocks to the front of the buggy; third hole in on the tower, inside hole on the arm. Note that the left side lower mounting screw (black) has a normal thread, the right side lower mounting screw (silver) is a reverse thread.

Attach the longer shocks to the rear of the buggy; second hole in on the tower, outside hole on the arm. Note that the left side lower mounting screw (silver) has a normal thread, the right side lower mounting screw (black) is a reverse thread.
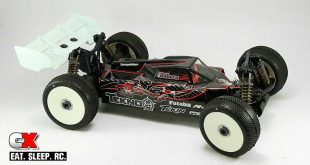
Boom! It’s starting to look like a buggy! Take a second to clean up any oily areas and lets get rocking on the electronics!
Tekno RC EB48.4 Build – Part 1 – Differentials
Tekno RC EB48.4 Build – Part 2 – Bulkheads / Suspension
Tekno RC EB48.4 Build – Part 3 – Steering
Tekno RC EB48.4 Build – Part 4 – Center Bulkhead
Tekno RC EB48.4 Build – Part 5 – Shocks
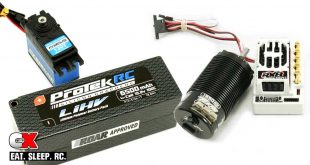
Tekno RC EB48.4 Build – Part 6 – Electronics
Tekno RC EB48.4 Build – Part 7 – Body, Wheels and Tires