
The Build – Part 4
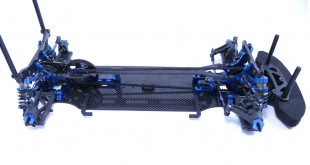
In this step I’ll be installing the one-piece center bulkhead, spur gear and belts. I’ll also be installing the front and rear differentials as well as the shock towers. A lot of steps coming up, but everything goes together quite easily.
 Everything goes together well with this step. No special notes to share.
The first order of business is to attach the one-piece center bulkhead. Blue threadlocker suggested here.

Next, assemble the spur gear. Use a small dab of blue threadlocker to ensure the screws stay put.

Slip a 20T pulley on each side of the spur gear assembly. Press until you feel them ‘lock’ into place.

Press a 4×8 bearing into each diff pulley, then slide the gear shaft through and secure with the 6mm screw. A light dab of blue threadlocker is suggested here.

Ring the rear belt round the spur gear assembly and attach to the center bulkhead. Yes, only one screw (10mm) on one side holds this pulley in place, so I suggest some blue threadlocker to keep this baby in place.

Ring the front drive belt around the spur gear assembly (opposite side of the rear belt pulley) and feed it to the front. Wrap it around front spool and insert the spool into the bulkhead. Make sure the flange on the cam rests inside the groove on the bulkhead. Press firmly into place.

Now wrap the rear belt around the rear diff and insert into the rear bulkhead. Same deal with the cam flange and bulkhead groove applies here. Note the orientation of the cam – Hole #7 towards the back.

Assemble the four bearing caps as shown, making sure to include the 1mm shim under each ballstud. Note the orientation of the flat spot on the bearing cap; they should be facing foward.

Attach a pair of bearing caps to the front bulkhead. A light dab of blue threadlocker is suggested.

Attach a pair of bearing caps to the rear bulkhead. A light dab of blue threadlocker is suggested here as well.

Feed the carbon fiber top deck between the front belt and attach to the front and rear bulkheads. Insert the screws only a little way, then tighten down in a criss-cross pattern. Again, a light dab of blue threadlocker is suggested.

Attach the front shock tower to the front bearing caps.

Attach the rear shock tower to the rear bearing caps.

Press the 4x7mm bearings into the aluminum steering bellcranks.

Assemble the steering rack as shown – ballstuds (with 1mm washers), 4x7mm bearings and the TIN 3.25mm ballstud. Slip the steering rack bushings up through the assembled rack and attach the two bellcranks. Blue threadlocker is suggested here.

Slide the assembled steering rack over the aluminum steering posts and attach to the chassis with the 3x6mm screws (yes, blue threadlocker here as well). The instructions mention slipping the steering post spacers onto the steering posts at this point, but let’s leave them off for now. Unless you use a screw to keep them in place, they’re going to fall off every time you attach a new piece to the chassis (and that’s alot!). We’ll add them later.
Starting to look like a car now, isn’t it? Next up: the drivetrain!
Team Associated TC7 Build – Part 1 – Shocks
Team Associated TC7 Build – Part 2 – Spool and Differential
Team Associated TC7 Build – Part 3 – Suspension
Team Associated TC7 Build – Part 4 – Center Bulkhead / Top Deck
Team Associated TC7 Build – Part 5 – Drivetrain
Team Associated TC7 Build – Part 6 – Shocks, Bumpers, Body Mounts
Team Associated TC7 Build – Part 7 – Anti-Roll Bar
Team Associated TC7 Build – Part 8 – Electronics


Step 5 is 10mm screw, you may want to clarify this, I started with a 6mm while following your directions.
Thanks, Boyd
In the previous step, I made note of the 6mm screw so I just assumed people would know the 10mm. But I can see how it might be a little confusing so I’ll mention the 10mm in Step 5. Thanks Boyd!