The Build – Part 3
Part 3 of the Vaterra Ascender K5 build involves assembling the rear axle. This process is very similar to the front axle with just a lot less parts. You should be able to breeze through it.
Build Notes: None.
Vaterra 1986 Chevrolet K5 Blazer Ascender Build Step 61
Start off by assembling the center driveshaft. This step is exactly the same as the front center axle you built it Part 2.
Vaterra 1986 Chevrolet K5 Blazer Ascender Build Step 62
Assemble the rear axle in the same manner as the front. Don’t forget to add a slight dab of threadlocker to the screw securing the sun gear.
Vaterra 1986 Chevrolet K5 Blazer Ascender Build Step 63
Assemble the rear spool as you did the front. Don’t forget to install the shims prior to the bearings.
Vaterra 1986 Chevrolet K5 Blazer Ascender Build Step 64
Insert the rear driveshaft assembly into the rear axle housing. You should also press the locknuts into housing at this point as well.
Vaterra 1986 Chevrolet K5 Blazer Ascender Build Step 65
Drop the spool into the rear housing as shown. Add a liberal amount of black grease to the gear and rotate to spread it out.
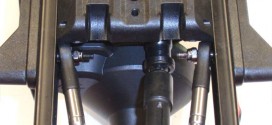
Vaterra 1986 Chevrolet K5 Blazer Ascender Build Step 66
Attach the chrome pumpkin cover (and lower brace) to the rear axle. Remember, the shorter screws go up top; the longer ones down low.
Vaterra 1986 Chevrolet K5 Blazer Ascender Build Step 67
Attach the multi-link brace to the rear axle.
Vaterra 1986 Chevrolet K5 Blazer Ascender Build Step 68
I found it easier to assemble the rear axle prior to sliding it into the axle housing. We’ll use the same method to assemble we did on the rear as we did on the front. Start by sliding a bearing onto the shaft followed by the axle housing cap.
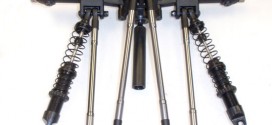
Vaterra 1986 Chevrolet K5 Blazer Ascender Build Step 69
Slide a 2nd bearing on the axle followed by the wheel hex and through-pin. Build 2 of these.
Vaterra 1986 Chevrolet K5 Blazer Ascender Build Step 70
Now slide the axle into the housing. Like the front, we need to apply a small amount of pressure to get the axle as far in the housing as possible. Twist the center driveshaft until you feel the axle key into the spool.
Vaterra 1986 Chevrolet K5 Blazer Ascender Build Step 71
Finally, use the 2 3x6mm screws to secure the axle cap to the housing. Do this for both sides.
Tony Phalen -
As an avid RC enthusiast, Tony has been building, bashing and racing RC Cars for over 30 years. He has participated in every kind of surface racing events - 1/18 scale trucks, 1/10 scale TC, Rock Racers, Rally - if it had wheels, he's raced it! He's also worked on both sides of the industry fence; collaborating with many major manufacturers (as well as being a sponsored driver) to working for a high-profile industry magazine. During this time he has learned many tricks, tips and techniques and is sharing that knowledge on CompetitionX - the most informative RC website on the internet!

 None.
None.