The Build – Part 7
Next up on our Vaterra Ascender K5 Blazer build are the suspension links. We’ll be building 2 pair for both the front and the back as well as the panhard rod.
Build Notes: The manual does have build steps for each length of links depending on which wheelbase you’re going to use. Step 106 (the first step) gives you a little tip on how to make sure you build the right link lengths.
The links are aluminum so make sure you use a bit of threadlocker on the long setscrews to ensure they don’t come apart.
Vaterra 1986 Chevrolet K5 Blazer Ascender Build Step 106
To keep things straight when building, I suggest underlining the wheelbase option at the top of the manual for the lengths you are going to build. Do this on all the pages with 314mm (for this example); it will help alot.
Vaterra 1986 Chevrolet K5 Blazer Ascender Build Step 107
I like to do a little pre-prep work prior to building. Start by pressing the flanged balls into the rod ends as shown.
Vaterra 1986 Chevrolet K5 Blazer Ascender Build Step 108
You’ll notice there are two lengths of rods; 61mm and 66mm. Separate them off to the side for quick reference.
Front Lower Suspension Links
Vaterra 1986 Chevrolet K5 Blazer Ascender Build Step 109
Take 4 of your pre-prepped rod ends and screw the setscrews (2 short, 2 long) in as shown.
Vaterra 1986 Chevrolet K5 Blazer Ascender Build Step 110
Dab a bit of threadlocker onto the setscrews and assemble 2 links. Make sure you add one of the 12mm spacer to the side with the long setscrew. Also make sure the flanges sides of the balls are facing the same way. Set these aside.
Front Upper Suspension Link
Vaterra 1986 Chevrolet K5 Blazer Ascender Build Step 111
Take 2 more rod ends and press 2 UN-flanged balls into them. Keep these separate from the flanged rod end assemblies.
Vaterra 1986 Chevrolet K5 Blazer Ascender Build Step 112
Build the upper link as shown using 1 UN-flanged rod end assembly with the short setscrew and 1 flanged rod end assembly with the long setscrew. There is a catch, however. You’ll need to use one of the 61mm links instead of the 66mm one the manual suggests. This is an oversight from the factory and might be fixed in you manual. Also, don’t forget the dab of threadlocker on the setscrews. Set this aside next to the upper link you just built.
Rear Lower Suspension Links
Vaterra 1986 Chevrolet K5 Blazer Ascender Build Step 113
Assemble 4 more rod end assemblies, all of these with the flanged rod end assemblies and the longer setscrews. Dip the setscrews into threadlocker and build 2 link assemblies as shown. Set these aside next to your other assembled links (don’t get them mixed up!)
Rear Upper Suspension Links
Vaterra 1986 Chevrolet K5 Blazer Ascender Build Step 114
Build the rear upper suspension links using two UN-flanged rod end assemblies and two flanged rod end assemblies. Both of these require the longer setscrews and the 12mm spacers. Don’t forget your threadlocker.
Panhard Rod Link
Vaterra 1986 Chevrolet K5 Blazer Ascender Build Step 115
The original manual does not include the steps required to build the panhard rod, but future versions might. For now, let’s just build two rod end assemblies; one flanged, one un-flanged.
Vaterra 1986 Chevrolet K5 Blazer Ascender Build Step 116
Assemble the panhard rod as shown using a 66mm link. Make sure the un-flanged rod end gets a long setscrew and the flanged rod end gets a short setscrew. Don’t forget your threadlocker and 12mm spacer.
Vaterra 1986 Chevrolet K5 Blazer Ascender Build Step 117
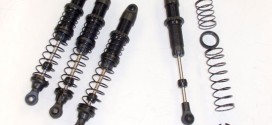
Grab a pair of shocks and your two front lower links from Step 109 and attach them to the front axle as shown. Do not overtighten the screw; just get it snug in the nylon nut. You also want to make sure the flanged balls are facing AWAY from each other.
Vaterra 1986 Chevrolet K5 Blazer Ascender Build Step 118
Attach the flanged rod end side of the panhard rod (from Step 115) to the tab on the steering block (see groovy red arrow).
Vaterra 1986 Chevrolet K5 Blazer Ascender Build Step 119
Now, attach the single, front upper suspension link (from Step 111) to the top of the front axle. Use the metal spacer to fill the gap on where the screw goes through (sounds complicated, much easier when you see it … see arrow).
Vaterra 1986 Chevrolet K5 Blazer Ascender Build Step 120
Moving to the rear, we’ll attach the last two shocks and rear lower suspension links (from Step 113) as shown. Again, make sure the flanged side of the balls are facing AWAY from each other. Do not overtighten.
Vaterra 1986 Chevrolet K5 Blazer Ascender Build Step 121
Finally, attach the rear upper suspension links (from Step 114) to the top of the rear axle.
Whew. Lots of links, lots of careful building. Congrats.
Tony Phalen -
As an avid RC enthusiast, Tony has been building, bashing and racing RC Cars for over 30 years. He has participated in every kind of surface racing events - 1/18 scale trucks, 1/10 scale TC, Rock Racers, Rally - if it had wheels, he's raced it! He's also worked on both sides of the industry fence; collaborating with many major manufacturers (as well as being a sponsored driver) to working for a high-profile industry magazine. During this time he has learned many tricks, tips and techniques and is sharing that knowledge on CompetitionX - the most informative RC website on the internet!

 The manual does have build steps for each length of links depending on which wheelbase you’re going to use. Step 106 (the first step) gives you a little tip on how to make sure you build the right link lengths.