Vaterra 1986 Chevrolet K5 Blazer Ascender Build – Transmission
The Build – Part 1
Part 1 of the Vaterra Ascender build revolves around the transmission. The Vaterra transmission is similar to other trail truck’s gearboxes so if you’ve built one before, this should be a walk in the park. If this is your first time, pay special attention to my notes to make the build roll along smoothly.
Build Notes: You will need threadlocking compound during this build. In Step 4 I give you a little tip on how to manage this. Give that a look before moving on.
The slipper clutch install is a bit tricky. Patience is needed here to make sure the slipper pads stay correctly keyed to the slipper plates.
Sliding the spiral axle-pin retainer into place is also a bit tricky. Take your time and follow my tip and you’ll be putting all of them on like a pro.
Vaterra 1986 Chevrolet K5 Blazer Ascender Build Step 1
We start off the build with a basic overview of the bag layouts that Vaterra has put in place. As you can see, they’ve labeled the bags A-1-1 for the first bag to use, A-1-2 for the second and so on. I found this to be pretty accurate when assembling the Ascender as it only allows access to the parts you need for a particular step.
Vaterra 1986 Chevrolet K5 Blazer Ascender Build Step 2
On with the build. Start by attaching the motor plate to the gearbox half as shown.
Vaterra 1986 Chevrolet K5 Blazer Ascender Build Step 3
Vaterra has supplied a solid, one piece lower transmission gear with the Ascender. Slide it onto the shaft followed by a plastic hat washer and bearing. Make sure you slide the hat washers on the correct way.
Vaterra 1986 Chevrolet K5 Blazer Ascender Build Step 4
As I mentioned in the build notes, some steps require you to use threadlocker. I like to put a small puddle of the blue threadlocker onto my plastic work area and dip from it. This allows me to control how much I put on.
Vaterra 1986 Chevrolet K5 Blazer Ascender Build Step 5
Dip the long setscrew into the threadlocker and insert it into the top shaft. Pop one of the e-clips into the groove at the other end.
Vaterra 1986 Chevrolet K5 Blazer Ascender Build Step 6
Slide the pin into the hole of the top shaft at the e-clip end, then slide the gear up and key it to the pin. Slide the plastic spacer on and capture both parts with another e-clip.
Vaterra 1986 Chevrolet K5 Blazer Ascender Build Step 7
On the short end of the top shaft, slide the small washer followed by the bearing. On the opposite end, slide the metal spacer onto the top shaft followed by the other bearing.
Vaterra 1986 Chevrolet K5 Blazer Ascender Build Step 8
This is how your assembled top shaft should look. Temporarily set it aside.
Vaterra 1986 Chevrolet K5 Blazer Ascender Build Step 9
Slide a bearing into each end of the transmission’s center gear.
Vaterra 1986 Chevrolet K5 Blazer Ascender Build Step 10
Slide the shaft through the center gear followed by a plastic spacer on each end. Set aside.
Vaterra 1986 Chevrolet K5 Blazer Ascender Build Step 11
Slide the lower transmission gear assembly into the case assembly, short side first.
Vaterra 1986 Chevrolet K5 Blazer Ascender Build Step 12
Insert the center gear assembly into the case as shown. Also insert the metal guide shaft into the case. Note the direction.
Vaterra 1986 Chevrolet K5 Blazer Ascender Build Step 13
Finally, slide the top shaft into place. Make sure that, when you insert all the gears, all of the bearings and spacers remain on the shafts.
Vaterra 1986 Chevrolet K5 Blazer Ascender Build Step 14
Slide the other transmission half into place and secure with the 4 screws. Snug them down and then give the top shaft a spin. If it spins freely, tighten the screws down. If they top shaft sticks or doesn’t rotate, disassemble and make sure you’ve assembled the gear sets correctly.
Vaterra 1986 Chevrolet K5 Blazer Ascender Build Step 15
Place the sticker onto the top of the transmission as shown. This helps keep and debris out of the transmission.
Vaterra 1986 Chevrolet K5 Blazer Ascender Build Step 16
We’re going to install the slipper clutch now but need to start by pre-compressing the slipper spring. Compress 2 or 3 times.
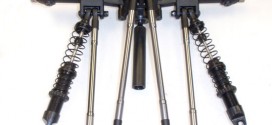
Vaterra 1986 Chevrolet K5 Blazer Ascender Build Step 17
A quick look at how this will all go together. I would suggest laying out the pieces prior to assembly as one of your hands will be busy holding the transmission.
Vaterra 1986 Chevrolet K5 Blazer Ascender Build Step 18
Place a slipper pad onto the gear, making sure the notches line up with the cutouts in the pad. Side a slipper plate onto the top shaft and, while holding the transmission as shown, slide the gear onto the shaft; pad side first. This part is a little tricky because the pad doesn’t ‘stick’ to the gear, so it moves around quite easily. Assembling in this ‘upside-down’ fashion will help keep it keyed the gear.
Vaterra 1986 Chevrolet K5 Blazer Ascender Build Step 19
Once you’re SLOWLY seated the gear (and the slipper pad is correctly keyed to the gear), flip the assembly over and hold as shown. This will keep the gear from moving and the slipper pad from becoming dislodged. Now place the second slipper pad into place, keying the notches to the cutouts as we did before.
Vaterra 1986 Chevrolet K5 Blazer Ascender Build Step 20
While still holding the gear firmly, slide the second slipper plate onto the top shaft followed by the large spring retainer, the slipper spring, the smaller spring retainer and the locknut. While not in the manual, a support page for the Ascender suggests tightening the slipper all the way down and then backing off 5 1/2 turns.
Vaterra 1986 Chevrolet K5 Blazer Ascender Build Step 21
For mojo, I’ll be using Tekin’s T-35 Heavy Duty Brushed 540 Motor and FX-R Brushed ESC. I’ve used this before and it’s a pretty stellar combo for crawling.
Vaterra 1986 Chevrolet K5 Blazer Ascender Build Step 22
Slide the large, red ‘washer’ onto the motor, lining up the holes with the mounting holes on the motor. Attach the motor using the 2 M3x8mm screws. Install the pinion and set the gear mesh as shown.
Vaterra 1986 Chevrolet K5 Blazer Ascender Build Step 23
Press the 8mm screw through the hole in the gear cover and slide the small o-ring over it. The Ascender’s gear cover doesn’t have a hole to adjust the slipper so you have to remove the cover each time you want to make an adjustment. Kind of bummed about that since, to me, the ‘hole’ method is what I’ve been accustomed to for years. On the other hand, once you adjust it there really should be much of a need to do it again.
Vaterra 1986 Chevrolet K5 Blazer Ascender Build Step 24
Set the cover into place and tighten the screw.
Vaterra 1986 Chevrolet K5 Blazer Ascender Build Step 25
You’ll notice as we build the center driveshafts that there are two lengths. The shorter, plastic slider shaft goes to the front while the longer to the rear.
Vaterra 1986 Chevrolet K5 Blazer Ascender Build Step 26
Match the flat spots on the outside of the metal coupler to the flat spots IN the slider shaft and press together. Dip the 10mm screw in your puddle of threadlocker and assemble.
Vaterra 1986 Chevrolet K5 Blazer Ascender Build Step 27
Goop some black grease onto the inner coupler and insert into the outer coupler. Slide the pin through the assembly.
Vaterra 1986 Chevrolet K5 Blazer Ascender Build Step 28
Now, the tricky part. This took me a few minutes to figure out but I found a super easy solution to get these on. Start by slide the spiral retainer over the outer coupler. Take one end the spiral coupler and pop it into it’s final groove area. Using your fingernail, hold it in place and slowly rotate the outer coupler. This will spiral the retainer into it’s final mounting location. Of course, this will only work if you have nails; if you don’t ask your girlfriend/wife/mom if she’ll lend you a hand…or a nail.
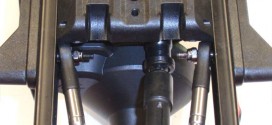
Vaterra 1986 Chevrolet K5 Blazer Ascender Build Step 29
Dip the setscrews into the threadlocker and thread them into each side of the outer coupler as shown (do not tighten down yet). Notice the ‘groovy’ spiral retainer in place.
Vaterra 1986 Chevrolet K5 Blazer Ascender Build Step 30
Slide both axle assemblies onto the output shaft of the lower transmission gear and tighten down.
Tony Phalen -
As an avid RC enthusiast, Tony has been building, bashing and racing RC Cars for over 30 years. He has participated in every kind of surface racing events - 1/18 scale trucks, 1/10 scale TC, Rock Racers, Rally - if it had wheels, he's raced it! He's also worked on both sides of the industry fence; collaborating with many major manufacturers (as well as being a sponsored driver) to working for a high-profile industry magazine. During this time he has learned many tricks, tips and techniques and is sharing that knowledge on CompetitionX - the most informative RC website on the internet!

 You will need threadlocking compound during this build. In Step 4 I give you a little tip on how to manage this. Give that a look before moving on.