Vaterra 1986 Chevrolet K5 Blazer Ascender Build – Part 4 – Chassis Assembly
The Build – Part 4
The chassis on the Ascender K5 is very similar in design to other scalers, however Vaterra has added a bit of a twist. Instead of 2 frame rails, they’ve included 4; 2 per side. Depending on the way you assemble them allows you to build it in one of four different wheelbase lengths; 278mm, 290mm, 302mm or 314mm. The assembly process is a little more complicated than a standard crawler so pay special attention to the notes to make sure you build it correctly the first time.
Build Notes: Since we’ll be building the Ascender with the K5 Blazer body, we will be using the 314mm wheelbase. That in mind, all of the build steps will be made using the 314mm length. Take a quick look at the frame build on Page 41 of the manual to see how you’ll be building it.
My center transmission mount side tabs were a bit oversized and wouldn’t fit into the frame rail. I know this is a result to the plastic swelling during production but you might just want to pre-fit yours first to save yourself any headaches later in the build.
Vaterra 1986 Chevrolet K5 Blazer Ascender Build Step 72
We start off by setting the left and right frame rails together. You’ll notice markings on the outside of the rails; these correspond to the length you plan on building. Again, double check the frame build on Page 41 to see how you need to assemble.
Vaterra 1986 Chevrolet K5 Blazer Ascender Build Step 73
The frame build is a little tricky with only 2 hands so we’ll need to use some ingenuity to complete it. Slide the frame rails together to your desired length. Grab a side rail mount (in this case, the left one, or the one with the wire clip to the back) and slide two screws through the inner-most holes as shown. Now, slide the side rail mount assembly through the frame rails.
Vaterra 1986 Chevrolet K5 Blazer Ascender Build Step 74
Pick up the left side frame assembly (now sort of held together by the screws) and slide the transmission mount into place. Screw the two screws from Step 73 into the mount. Note the orientation of the mount.
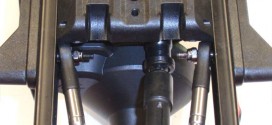
Vaterra 1986 Chevrolet K5 Blazer Ascender Build Step 75
This is a side view of the left side rail mounted to the center transmission mount. At this point you can install the 3rd screw in the front-most hole, securing on the backside with a black locknut.
Vaterra 1986 Chevrolet K5 Blazer Ascender Build Step 76
The instructions have you ‘slide’ these mounts into place and, for the most part, they do stay in place. However, you have to be careful not to knock the parts out of position and, during final assmbly, line up the mounting holes. I decided to use some screws to keep the mounts keyed into position from here on out. You only have to tighten the screws just a tad; enough to get them to hold the parts in place.
Vaterra 1986 Chevrolet K5 Blazer Ascender Build Step 77
Attach the rear electronics box mount the same way.
Vaterra 1986 Chevrolet K5 Blazer Ascender Build Step 78
Slide the right-side chassis plates together as you did in Step 73. Slide two M3x16mm screws through the inner holes of the right-side side rail mount and insert them into the corresponding holes (dependent on your chassis length) as you did in Step 73.
Vaterra 1986 Chevrolet K5 Blazer Ascender Build Step 79
Pick up your right-side frame assembly and, using the same method we did in Step 74, attach the frame to the center transmission mount. This is a good time to double-check your frame length to make sure it is correct.
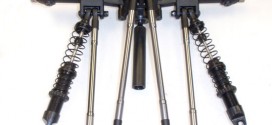
Vaterra 1986 Chevrolet K5 Blazer Ascender Build Step 80
The next step is to attach the front shock hoops. First, remove the screws you used to hold the center mounts into place (if you used them). If you noticed that the hoops look different than what is shown in the manual, you have a keen eye. First, make sure you have the two FRONT hoops; they’ll fit the front mounting points but may have the body mount locators to the front (instead of to the back as the manual shows). You’ll also notice that the right front one has the panhard rod mounting tab. Attach both of these to the front, using the plastic ‘chassis nuts’ to lock the mounts into place. Now slide the aluminum tube in-between the two mounts as shown.
Vaterra 1986 Chevrolet K5 Blazer Ascender Build Step 81
Remove the screws you used to hold the rear center mount into place (if you used them) and then follow the same procedure in Step 80 to attach the rear shock hoops on the rear.
Vaterra 1986 Chevrolet K5 Blazer Ascender Build Step 82
Remove the screws you used to hold the center-front mount into place (if you used it) and attach the front bumper extenders into place.
Vaterra 1986 Chevrolet K5 Blazer Ascender Build Step 83
Slide the rear chassis support in-between the frame rails as far as it will go.
Vaterra 1986 Chevrolet K5 Blazer Ascender Build Step 84
Attach the rear bumper extenders as shown.
Vaterra 1986 Chevrolet K5 Blazer Ascender Build Step 85
Because the mounting holes in the transmission were pretty tight, I pre-drilled them to make this part of the build much easier. I would suggest doing that prior to installation. Once you place the transmission assembly into position…
Vaterra 1986 Chevrolet K5 Blazer Ascender Build Step 86
…attach the 4 screws into the bottom of the transmission to hold it in place. Tighten all the way down.
Tony Phalen -
As an avid RC enthusiast, Tony has been building, bashing and racing RC Cars for over 30 years. He has participated in every kind of surface racing events - 1/18 scale trucks, 1/10 scale TC, Rock Racers, Rally - if it had wheels, he's raced it! He's also worked on both sides of the industry fence; collaborating with many major manufacturers (as well as being a sponsored driver) to working for a high-profile industry magazine. During this time he has learned many tricks, tips and techniques and is sharing that knowledge on CompetitionX - the most informative RC website on the internet!

 Since we’ll be building the Ascender with the K5 Blazer body, we will be using the 314mm wheelbase. That in mind, all of the build steps will be made using the 314mm length. Take a quick look at the frame build on Page 41 of the manual to see how you’ll be building it.