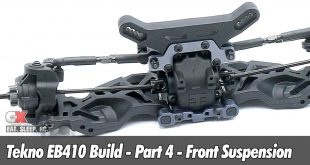
The next step in our Tekno EB410 build is the steering system and bulkhead assembly. The EB410 uses a dual bellcrank steering setup that rides on a full set of bearings. The bulkheads are designed to completely encapsulate the diff, using molded plates on the bottom to seal everything up.
 None for this step.

Ok, let’s get started by installing the ballstuds into the steering rack; four 8mm washers are required behind each steering ballstud.

Press a 4×7 bearing into the steering rack, four in total. Slide the aluminum spacers into the bellcrank arms, aligning the hex to the hex in the arm. Insert this assembly into the bearing and secure with the M3x8mm screws. A light dab of the blue threadlocker is suggested. DO NOT overtighten – just snug these screws up. Overtightening can bind the steering movement.

Press a 5×11 bearing into each side of the bulkhead, then slip the output shaft through from the inside. After applying a small drop of blue threadlocker, insert the 4mm grub screw into the outdrive and slide the assembly onto the output shaft. Move the outdrive as far onto the output shaft as possible and tighten down the grub screw.
NOTE: There should be the most minute amount of play between the output shaft and the bulkhead – as small as possible. To close and you could bind the spinning movement of the shaft.

Attach the steering assembly to the front bulkhead with the two steering posts. DO NOT OVERTIGHTEN. Again, snug these up so you don’t bind the steering movement.

Grab your front diff (you did mark your front diff as such, right?) and attach a 10×15 bearing on each side, then slip it into the bulkhead. Note the orientation.
Verify that it spins freely, then attach the bulkhead cover. A small amount of black grease is suggested on these gears.

Flip the bulkhead over and attach the bottom bulkhead plate. Set this assembly aside.

The rear bulkhead assembles like the front; install the two 5×11 bearings, the output shaft and the outdrive. Don’t forget the blue threadlocker on the grub screw.

Attach a pair of ballstuds to the aluminum mount (see picture for location) and attach this assembly to the rear bulkhead.

Grab your rear diff and attach a 10×15 bearing onto each side, the slip it into the rear bulkhead as shown. Note the orientation.
Verify that it spins freely, then attach the bulkhead cover. A small amount of black grease is suggested on these gears.

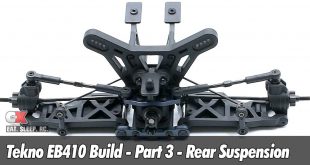
Attach the wing mounts to the rear shock tower.

Attach the tower assembly to the rear bulkhead. You’ll need to include the rear body mount in there as well.

Flip it over and attach the bottom bulkhead plate.
Excellent. As a final check, make sure both assemblies rotate smoothly before moving on to the next step.
Tekno EB410 Buggy Build – Part 1 – Differentials
Tekno EB410 Buggy Build – Part 2 – Steering and Bulkheads
Tekno EB410 Buggy Build – Part 3 – Rear Suspension
Tekno EB410 Buggy Build – Part 4 – Front Suspension
Tekno EB410 Buggy Build – Part 5 – Chassis
Tekno EB410 Buggy Build – Part 6 – Shocks
Tekno EB410 Buggy Build – Part 7 – Final Assembly