The Build – Part 2
The second part of the Axial Yeti XL build has us installing the front differential into the front gearbox.
 Check and double check to make sure that you install the front diff in the right direction.
Be VERY careful when you’re using the M2.6 screws to capture the axle assembly into the gearbox. You need to seat the assembly completely before screwing them in. They’re not very long so if you try to use them to seat the axle you could strip out the plastic.

We start off the front gearbox build by assembling the front drive axle. Slide the barrel into the axle ball, then insert that into the 11T diff gear. Insert the pin through the assembly, making sure to line up the holes. Use a little bit of black grease on the ball to lube everything up.

This drive axle doesn’t use a set screw to capture the pin. Instead, we’ll be using a pair of bearings and a spacer to capture it. Start by sliding a pair of 15×18 washers onto the assembly followed by a 15×21 bearing, the plastic spacer and then another 15×21 bearing.

This next part is a little tricky; we’ll be installing the C-clip. The easiest way I found was to stand the axle assembly up, press the bearings/spacer/shims firmly down onto the gear and then insert the C-clip. There is a notch on the gear that the C-clip has to snap into, so make sure you get it in there. Now, with a pair of pliers, carefully snap the clip into the groove.

Here’s what the clip should look like.

Slide the axle assembly into the rear half of the gearbox. Press the bearings into recess; press them firmly into place. Once fully seated, secure it into place with the 3 M2.6 screws. DO NOT use the screws to fully seat the axle assembly. You could strip out the plastic. This is a pretty crucial assembly step.

Apply a pretty liberal amount of the supplied grease to the front differential and slide it into place. More is better here.

Mate the front half of the gear case to the assembly. Before pressing together, slide the front shock tower between the two halves and screw together. Do not overtighten; snug is good enough.

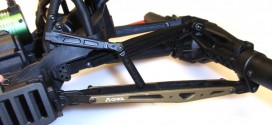
Attach the body mount brace to the backside of the shock tower.

Slide the two body mounts into place and secure with the M4 shouldered setscrews. I used the kit settings for the height adjustments.
Great job. Set the front gearbox assembly off to the side and let’s get crackin’ on the rear.
Axial Yeti XL Build – Part 1 – Front Differential
Axial Yeti XL Build – Part 2 – Front Gearbox
Axial Yeti XL Build – Part 3 – Rear Differential
Axial Yeti XL Build – Part 4 – Rear Axle
Axial Yeti XL Build – Part 5 – Front Suspension
Axial Yeti XL Build – Part 6 – Steering
Axial Yeti XL Build – Part 7 – Chassis
Axial Yeti XL Build – Part 8 – Electronics
Axial Yeti XL Build – Part 9 – Transmission
Axial Yeti XL Build – Part 10 – Rear Suspension
Axial Yeti XL Build – Part 11 – Shocks
Axial Yeti XL Build – Part 12 – Body, Wheels, Tires