The Build – Part 10
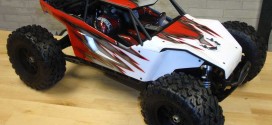
The Axial Yeti XL uses a solid rear axle that is connected to the chassis via long, molded links. The rear is caged to support the shocks and an interesting box that could be used to hold something like a light controller or spare parts.
 Some of the build steps can be a little tricky, so I’ve come up with a certain build order that I feel will make it easy for you. I’ve outlined them in the actual step.

Start this step by assembling hte rear cage. I would suggest arranging the parts prior to assembly to make sure you have them correct. The picture shows the completed rear cage; you can use that for reference.

After you’ve completed the cage, attach the box bottom to it.

Axial doesn’t supply anything to go in here, so I’m not entirely sure what it’s for; maybe a light controller or something. I used it to put a few spare parts I had lying around. This might make some very interesting noises when the Yeti is running.

Install the box lid.

The anti-roll bar is probably one of the most welcomed features of this truck! Start by slipping the bar through the brace and then screwing the U-joint onto the bar. Go ahead and do this to both sides.

Press the plastic balls into the molded anti-roll bar links.

Slip the links into the U-joint and secure with the M3 screw. Do not overtighten; we want free movement of the link.

Slide the link up and into place on the back of the cage and use the two AX31005[3] braces to capture it. These braces need to be pressed between the cage an the anti-roll bar. There is a trick to assembling this…

First, press one brace into place and thread the screws in to hold it. Don’t thread them in all the way.

Using your thumb to flex the foot of the cage, pull the anti-roll bar towards you and slip the other brace into place. Insert the M3 screws and tighten both sides down.

Insert the M3 set screws and tighten down just enough to make contact with the anti-roll bar, then back off a teeny tiny bit. You want these to keep the bar from moving back and forth, but not to hinder it’s rotation.

Align the rear cage with the chassis assembly and attach in this order: screw in the four M3x18 screw first (from the bottom) followed by the four M3x18 screws through the top.

Here’s a look at the link mounts from the above step.

Mate the battery doors to the chassis and slide the two long molded pins into place. Capture the front pin with a M3x6 screw (on both sides).

Flip the doors up and secure with the body clips.

Attach a link brace to each side of the chassis.

Pop the plastic balls into the ends of the inner links.

Attach the molded braces to both of the inner links. The molds are a little tight so getting the tab into the slot on the link could prove a bit tricky. You can get it started and then ‘compress’ it with the M3 screw and locknut.

Pop the plastic balls into the ends of the outer links.

Attach the aluminum braces to both the outer links.

The manual has you building both links the same, but I chose to build one ‘opposite’ so that the screws on both face inwards. This is completely optional.

Attach the outer links to the rear axle as shown. Notice the screws on the link facing inward. Also note the orientation of the link. Attach both sides.

Connect the inner links by sliding them into place on the rear axle and securing with the 45mm screw (and nut). Not the orientation of the rod ends.

I wanted to point out another slight error in my manual (yours might be fixed). It shows six of the 6mm setscrews being used; I only have four. I did have 2 of the shorter ones though, so I had to figure out the best place to use these.

Mate the rear slider shaft together and attach the outer links as shown using the 6mm set screws.

Now attach the inner links in the ‘center’ hole using the 6mm set screws.

Finally, attach the anti-roll bars to the outer links using the shorter set screws. You want to try and center all set screws from Steps 154, 155 and 156.
Now we have the front and rear drive sections attached to the chassis. Swivel the rear axle a few times to make sure there is no binding. You may feel a little resistance, but that’s just the anti-roll bar doing it’s job.
Axial Yeti XL Build – Part 1 – Front Differential
Axial Yeti XL Build – Part 2 – Front Gearbox
Axial Yeti XL Build – Part 3 – Rear Differential
Axial Yeti XL Build – Part 4 – Rear Axle
Axial Yeti XL Build – Part 5 – Front Suspension
Axial Yeti XL Build – Part 6 – Steering
Axial Yeti XL Build – Part 7 – Chassis
Axial Yeti XL Build – Part 8 – Electronics
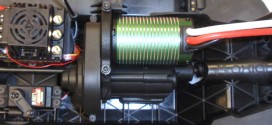
Axial Yeti XL Build – Part 9 – Transmission
Axial Yeti XL Build – Part 10 – Rear Suspension
Axial Yeti XL Build – Part 11 – Shocks
Axial Yeti XL Build – Part 12 – Body, Wheels, Tires