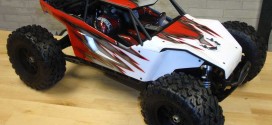
The Build – Part 6
The Yeti XL uses a dual-bellcrank steering setup that rolls on a nice set of bearings. It has an integrated servo saver as well as adjustable links for toe.
 If you have an older manual, you’ll notice that the part number for the rod ends in Step 80 is AX80092[4]. You won’t find those parts on that tree. The correct part number should be AX31032.

Press a 6×10 bearing into each end of the right bellcrank arm, then slide one of the steering posts into place.

Pre-compress the servo saver spring a few times to settle it.

Anyone who follows my builds recognizes this little trick. Application of a little black grease on the servo saver section helps prevent the two plastic pieces from getting gritty and possibly sticking. Only a little on one side of the servo saver is necessary.

Mate the upper and lower servo saver arms together and set the spring into place. Secure the spring with the cap and screw into place. Press a 6×10 bearing into each end followed by the other steering post.

Here is what you final servo saver assembly should look like.

Attach the left and right steering bellcrank arms to the center drag link. Do not overtighten; make sure everything swings back and forth easily.

Build two steering links. The 62mm gap is a good starting point. If you can’t find the rod ends, you didn’t read the Build Notes for this build step. Scroll to the top and check them out.

Pop the plastic balls into the rod ends.

Attach the steering links to the drag link. Again, do not overtighten.

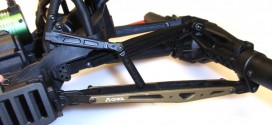
The manual shows us attaching the steering system to the chassis and the steering links to the steering knuckles, but that became quite the mess to deal with. We’re going to deviate slightly from the manual to make life a little easier. Start by sliding the two M3x50mm screws through the metal top brace, then the top deck.

Flip that assembly over and slide the steering system into place.

While aligning the screws in the top deck to the mounting holes in the front suspension, lower the front suspension onto the overturned steering setup. Hold together, flip over and start tightening the two 50mm screws. Do not tighten down all the way yet. You want to get them in about 1/2 way.
That steering assembly probably took alot out of you, so take a quick break before we start assembling the chassis.
Axial Yeti XL Build – Part 1 – Front Differential
Axial Yeti XL Build – Part 2 – Front Gearbox
Axial Yeti XL Build – Part 3 – Rear Differential
Axial Yeti XL Build – Part 4 – Rear Axle
Axial Yeti XL Build – Part 5 – Front Suspension
Axial Yeti XL Build – Part 6 – Steering
Axial Yeti XL Build – Part 7 – Chassis
Axial Yeti XL Build – Part 8 – Electronics
Axial Yeti XL Build – Part 9 – Transmission
Axial Yeti XL Build – Part 10 – Rear Suspension
Axial Yeti XL Build – Part 11 – Shocks
Axial Yeti XL Build – Part 12 – Body, Wheels, Tires