
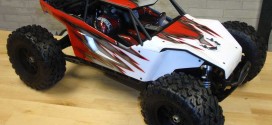
The Build – Part 4
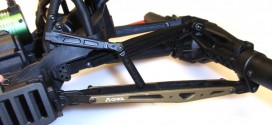
The Axial Yeti XL uses a little different rear axle than most vehicles. We’ll be building a solid rear axle that includes the diff from our previous step.
 Pay close attention to the installation of the outer carrier. These are directional and do need to be installed a certain way.

Let’s start the rear axle by assembling the rear input shaft. Like the front, insert the CVD barrel into the joint and slide it into the 11T gear. Slide the pin through the holes in the gear and input barrel. Make sure to use a good amount of black grease to keep things lubricated.

Slide a pair of 15×18 washers followed by a 15×21 bearing, plastic spacer and second 15×21 bearing. These parts capture the CVD pin and prevent it from falling out.

Set the gear assembly up on it’s side and slide the C-clip into place. Press the bearings/spacer/shims down firmly to seat them and, using needlenose pliers, carefully snap it into the groove, just like the front assembly.

Here is what the assembly should look like. Just make sure the clip is completely seated in the groove.

Mate the splined CVD to the splined end of the slider shaft. Press together firmly to make sure it’s completely seated and secure with the M3 flathead screw. A drop of threadlocking compound will help prevent this screw from backing out.

Slide the slider assembly through the rear axle housing as shown and firmly press to completely seat the bearings into the recess.

Secure the slider assembly with the 3 M2.6 screws. Like the front, make sure that the slider assembly is completely seated.

Grab your differential and apply a good amount of the supplied grease to the gears. Press the diff into the housing and screw the rear axle cap into place.

The instructions have you inserting both drive axles into the rear housing, but I actually found it easier to build them a little different. Start by sliding a 8×16 bearing onto each axle and then firmly pressing it into the outer carrier to square it up and completely seat it.

Now slide that assembly into the rear axle housing. While pressing, rotate the drive axle to key the dogbone to the diff inside. Note the orientation of the link pickups to the rear axle; they should be pointing down.

Secure the outer carriers with the M3 screws. I used a small driver to align the holes prior to installation.

Attach the rear axle brace. Getting this piece to snap into place was a major pain. I found it easiest to install one end, secure with the two M3x25mm (only engage them about 5 or 6 threads in) and then flex the piece to pop the other end in. You can then insert the other M3x25mm screws and tighten down. Install the M3x10mm screw last.

Slide the aluminum hexes onto the axles, insert the drive pin and secure with the M5 setscrew. Threadlocking compound is highly recommended here.
Once complete, rotate the slider axle a few times to make sure everything rotates smoothly. Time to move on to the front suspension.
Axial Yeti XL Build – Part 1 – Front Differential
Axial Yeti XL Build – Part 2 – Front Gearbox
Axial Yeti XL Build – Part 3 – Rear Differential
Axial Yeti XL Build – Part 4 – Rear Axle
Axial Yeti XL Build – Part 5 – Front Suspension
Axial Yeti XL Build – Part 6 – Steering
Axial Yeti XL Build – Part 7 – Chassis
Axial Yeti XL Build – Part 8 – Electronics
Axial Yeti XL Build – Part 9 – Transmission
Axial Yeti XL Build – Part 10 – Rear Suspension
Axial Yeti XL Build – Part 11 – Shocks
Axial Yeti XL Build – Part 12 – Body, Wheels, Tires


These directions for the Yeti XL Kit are great! Is there a way to get a printable copy of all of them?
Thanks,
Bill ……
wlewis400@gmail.com
Hi Bill. Thanks, this was a pretty big project; alot longer build that I had expected. Unfortunately I don’t have it in a PDF format for printing. Hopefully you’ll still be able to use them.
Tony