Vaterra Ascender K5 Blazer Build – Part 5 – Installing the Electronics
The Build – Part 5
The manual has us assembling the chassis and installing the electronics in the same step but I chose to break it out into two for simplicity sake. Vaterra has given us a few cool features in the electronics install section and I felt it needed its own section.
Build Notes: As with all builds, it’s a good idea to make sure all your electronics are working and your servo is centered prior to installing. So, take a moment, hook it up and test it.
Depending on which wheelbase option you’ve chosen, there are two ways to mount the servo. Wheelbase options WB3 and WB4 use the method we’re explaining here; wheelbase options WB1 and WB2 will use the build option on Page 46 of the manual.
Vaterra 1986 Chevrolet K5 Blazer Ascender Build Step 87
The first step in the electronics build is to prep the servo for install. Attach the servo horn as shown after, of course, you did the electronics pre-test. It should be lined up straight down the servo.
Vaterra 1986 Chevrolet K5 Blazer Ascender Build Step 88
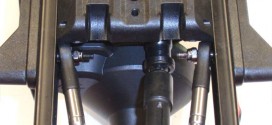
Flip the chassis over and mount the servo using the M3x10mm screws. Don’t forget the washers. Also, note the orientation and direction of the servo.
Vaterra 1986 Chevrolet K5 Blazer Ascender Build Step 89
Attach the ESC mounting plate to the extensions off the back brace.
Vaterra 1986 Chevrolet K5 Blazer Ascender Build Step 90
Attach the receiver box. It’s not waterproof but it doesn’t look like it would be that hard to waterproof it yourself. Make sure the antenna tube mount is to the rear.
Vaterra 1986 Chevrolet K5 Blazer Ascender Build Step 91
There’s quite a bit of room in the box, enough for a small receiver and a lighting control module. Since my Tekin ESC isn’t waterproof, I elected to drop it in here for a little extra protection. You’ll need to do some creative wiring to make everything fit but it’s possible. I would suggest measuring out the wires prior to soldering to the ESC to make sure they are long enough.
Vaterra 1986 Chevrolet K5 Blazer Ascender Build Step 92
Solder up the wires to the motor. You can run them through the wire looms on the right side of the chassis to keep things neat.
Vaterra 1986 Chevrolet K5 Blazer Ascender Build Step 93
The manual has you installing the floating battery tray in the next step but I chose to do it now so that I could make sure my wiring was out of the way. Feed the strap through the tray and attach the tray to the rotating points.
Vaterra 1986 Chevrolet K5 Blazer Ascender Build Step 94
One problem with the Ascender is the fact that the servo lead will not reach the receiver box; the distance is to great. You will need to get a servo extension of at least 9″. Once again,you can feed the lead through the looms but they are only located near the back of the chassis. To keep them from getting hung up on any rocks (or chassis bits), I zip-tied them to the chassis. You can see my locations in the picture (check out the groovy red arrows).
Vaterra 1986 Chevrolet K5 Blazer Ascender Build Step 95
Once you get the electronics figured out, all the leads up through the radio box opening and the antenna mounted, attach the radio box cover. I mounted the switch on the ESC tray.
Now that your electronics are installed, you can insert your battery and do the final battery wiring. I used the same plug that came on my Dynamite battery.
Tony Phalen -
As an avid RC enthusiast, Tony has been building, bashing and racing RC Cars for over 30 years. He has participated in every kind of surface racing events - 1/18 scale trucks, 1/10 scale TC, Rock Racers, Rally - if it had wheels, he's raced it! He's also worked on both sides of the industry fence; collaborating with many major manufacturers (as well as being a sponsored driver) to working for a high-profile industry magazine. During this time he has learned many tricks, tips and techniques and is sharing that knowledge on CompetitionX - the most informative RC website on the internet!

 As with all builds, it’s a good idea to make sure all your electronics are working and your servo is centered prior to installing. So, take a moment, hook it up and test it.