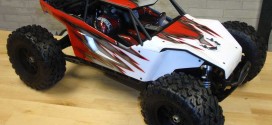
The Build – Part 8
Since this is a kit, I had the luxury of outfitting the Yeti XL with whatever electronics I wanted to. I’m not going to be playing nice with this rig, so I wanted gear that I knew would survive lots of full-throttle. Thanks Futaba, Castle Creations and Maxamps for your contribution to this bonzai build.
 The Yeti XL isn’t for the feint of heart; it’s also not a place for puny electronics. I would suggest installing some pretty stout equipment or you’ll be doing it more than once.
Make sure, when installing, that the waterproof rubber wire gaskets seat correctly into the receiver box. The last thing you want is this 15lb behemoth barreling away from you at 60+mph!

This is a beast of a rig that sports some pretty hefty tires, so I needed a servo that’s going to be able to handle a major workout. That said, nothing other than a Futaba servo would fit the bill; their BLS371SV was mounted to the chassis.

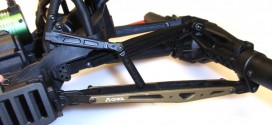
Feed the wire under the front CVD and capture it with this cool little lead cover.

Build the drag link. 30mm is a good starting point.

Assemble the steering link using the correct horn for your servo. Notice the direction of the ball inserts.

Feed the steering link through the opening and attach it to the servo saver arm.

Attach the servo horn to the servo. Doing it in this order makes it easier to hold on to when attaching it to the servo saver arm.

Tape your receiver into the receiver box. Feed the antenna through the small, rubber water sealer and press the sealer into the groove in the box.

Take your servo and ESC wires and slide them through the large, rubber water sealer, then press the sealer into the groove in the box. Pull as much of the wire into the box as you can to avoid having a rat’s nest outside of the box. Use the AX31021 spacer to fill the top hole in the water sealer.

Press the waterproofing gasket into the lid of the receiver box.

Carefully place the lid on top of the receiver box. Press down firmly to seat it.

Set the ESC mount on top of the receiver box and screw into place. Feed the antenna wire up through the mount and into the tube. Secure the tube with the M3 set screw.

Apply a hefty amount of double-sided tape to your ESC and press onto the mount. This is also a good time to affix your on/off switch.
Electronics in and ready to go. The next step involves the heart of the beast; the transmission!
Axial Yeti XL Build – Part 1 – Front Differential
Axial Yeti XL Build – Part 2 – Front Gearbox
Axial Yeti XL Build – Part 3 – Rear Differential
Axial Yeti XL Build – Part 4 – Rear Axle
Axial Yeti XL Build – Part 5 – Front Suspension
Axial Yeti XL Build – Part 6 – Steering
Axial Yeti XL Build – Part 7 – Chassis
Axial Yeti XL Build – Part 8 – Electronics
Axial Yeti XL Build – Part 9 – Transmission
Axial Yeti XL Build – Part 10 – Rear Suspension
Axial Yeti XL Build – Part 11 – Shocks
Axial Yeti XL Build – Part 12 – Body, Wheels, Tires